Monday, November 2, 2015

Stir Fry Black Pepper Beef

Almost anything, or everything taste yummy when cooked in black pepper sauce.  With a bottle of Singlong black pepper sauce in the fridge, and a tupperware of beef slices in my freezer, let's do a quick stir-fry black pepper beef dish!


In no time, dinner was served, plain rice with stir fry black pepper beef and a simple stir fry vege with minced garlic. This is how simple our meals are, sometimes a soup and a vege with rice and that's it. No need for 3 dishes and 1 soup all day long :)


Stir Fry Black Pepper Beef

230g stir fry beef (sliced)
2 stalks of spring onions, sliced to 2 inches in length
1 medium onion, wedged
1/2 yellow/red/ green capsicum sliced into thin strips
1 inch ginger, peeled and sliced

2 tbsp Canola oil
3tbsp Black pepper sauce
1/2tbsp sugar
2 to 3 tbsp water

Marinate
1.5 tsp cornflour
1 tsp light soy sauce
2 tsp oyster sauce
1 tsp Chinese cooking wine
1/2 tsp black pepper powder


1. Dry sliced beef with kitchen towel and place sliced beef in a bowl.
2. Add in all marinate ingredients and mix well with beef. Cover with clingwrap and let sliced beef be marinated in fridge for at least 30min. I let it be marinated for 3 hours.
3. Heat oil in frying pan (high heat).
4. Add ginger and onion and stir fry till fragrant. Add in spring onion and capsicum and stir fry till capsicum strips turn half cooked.
5. Add in marinated beef and loosen beef slices up before adding in black pepper sauce and sugar. Mix well to coat beef slices with sauce. Add in water and stir well. Beef slices should be cooked in 3 to 4min. Dish out and serve immediately with plain rice.

Sunday, November 1, 2015

Espresso Chiffon Cake


Haa... so my obsession with baking anything espresso is still not quite done yet!  Whenever my mood to bake arises, the first thing that comes to my mind would be, "Can I do it espresso flavour??" Well, so here you are... my aromatic espresso chiffon cake! 


Not wanting my chiffon cake to have those instant coffee cake aroma, I baked this chiffon cake using 2 shots of freshly brewed espresso coffee. Up it to a more intense level by adding some cocoa powder and achieved this one chiffon cake that I will surely bake again. So looking forward to my breakfast tomorrow!  ♡♡♡


Espresso Chiffon Cake

蛋黄面糊 Egg yolk mixture
5个蛋黄 / 5 egg yolks
20克糖 / 20g sugar
30克油 / 30g oil 
60克浓咖啡 (不必加糖) / 60g espresso (no sugar added)
1 1/2 大匙 无糖可可粉粉 / 1 1/2 tbsp unsweetened cocoa powder
100克低筋面粉 / 100g plain flour

蛋白霜 Egg white meringue
5个蛋白 / 5 egg white
60克糖 / 60g sugar


Almond flakes, for toppings (optional)


1. 准备浓咖啡, 在浓咖啡还没冷却时,加入可可粉拌均,放凉备用。

Prepare espresso, add in cocoa powder and mix well till cocoa powder is dissolved. Set aside to cool before use.

2. 蛋黄加入糖拌均。

combine egg yolks and sugar and mix well with a whisk till sugar is dissolved.

3. 加入油和凉了的浓咖啡搅拌均匀。再加入筛过的低筋面粉。

Stir in oil and cooled espresso mixture, whisk till combined before adding in sifted plain flour and mix well till no clumps are present.

4. 蛋白搅拌到起粗泡沫然后分三次加入糖搅拌至硬和带有光泽。
In a separate clean and dry mixing bowl, add in egg white and beat till large bubbles are formed. In 3 additions, add in sugar. Make sure to beat till sugar is dissolved in between each addition. Stop when the white mixture reaches stiff peak stage.

5. 蛋白分三次加入蛋黄糊里,轻轻的把蛋白和蛋黄拌至没蛋白粒存在即可。
In 3 additions, fold in egg white meringue into yolk mixture in a one gentle direction, taking care not to over fold and deflate mixture.

6. 在烤模里撒一些杏仁片, 然后将面糊倒入烤模, 放入预热烤箱以 160'C 烤 1 小时。

Place some almond flakes into chiffon tube pan and then pour cake mixture into chiffon tube pan and put to bake in a preheated oven and bake at 160deg C for 1 hour or till done.


7. 蛋糕烤好后从烤箱取出,倒扣待冷再切块。

Remove from oven and overturn to allow chiffon cake to cool before slicing.


The almond flakes added some munch to the chiffon cake.


Slice when cool and enjoy!

Saturday, October 31, 2015

Potato, Ham & Onion Buns


If you like the potato and ham buns from Four Leaves Bakery, you should like these buns. I have always been wanting to make these buns but eh erm... laziness got the better of me. I did not like peeling of the potatoes and boiling it, and then mashing it. I thought the filling alone was quite "tedious" already. Okay.... maybe just me. Haha!  Anyway I finally got myself to make them (I wasn't feeling that lazy that day hehe~), and I love it.

Buns sold outside nowadays do not come as cheap anymore. I am glad I make my own bread and can save spending that much on bread and buns!


Try making these and tell me if you like it 😉

Potato, Ham & Onion Buns

Gelatinized Basic Sweet Bread recipe by Alex Goh

Gelatinized dough
50g bread flour
35ml boiling water

1. Place flour in a mixing bowl.
2. Add hot boiling water and mix with wooden spoon to form a rough dough.
3. Cover bowl with cling film and leave dough to cool in the fridge for at least 1 hour, and up to 48 hours.


Basic sweet bread dough

200g bread flour
40g sugar
10g milk powder
1/2 tbsp instant yeast
1/4 tsp salt
87ml cold water
1/2 cold egg (about 30g) - leftover egg to be used for eggwash
30g cold butter, cubed 


Potato, Ham & Onion Fillings
280g potato, skinned, boiled and mashed
2 or 3 pcs ham, sliced into little cubes
1 onion, cut into small cubes
1/2 tsp salt
20g melted butter
A dash of black pepper


1. Combine flour, sugar, milk powder, yeast and salt together in a mixing bowl.
2. Tear the gelatinized dough into pieces and add to the bowl along with the eggs
3. Using a stand electric mixer, mix on low speed, adding cold water gradually.
4. Mix until dough is well combined and leave the side of bowl.
5. Add in the cold butter cubes and mix on medium speed until dough is smooth.
6. Shape dough into a ball, leave to proof for 40 min or until doubled.
7. To make the filling - Pan-fry the onion cubes abit till slightly softened and fragrant. Set aside to cool.  (You can skip this step if you are okay with the raw onion taste)
8. In a mixing bowl, add in mashed potato, cubed ham, onion bits followed by seasonings (except melted butter) and mix well to combine. Do a taste test and add more salt till need.


9. Drizzle melted butter over filling mixture and mix well.
10. Portion them equally according to the for the bun fillings, use a spoon to shape them into round shapes for easier wrapping and place them on a plate. Cover with clingwrap for later use.
11. Punch down dough to rid excess air, then divide dough into 6 or 8 or 10 equal portions and  roll it round and set aside for 5 min to let it relax for easier rolling and wrapping.
8. Roll out dough into a round shape.
9. Spoon a portion of potato filling onto centre of dough and wrap up.
10. Seal bottom of dough to secure  fillings from spilling out. Set dough with sealed ends at bottom.
11. Place dough onto greased baking tin.
13. Cover with clean moist cloth and leave to proof for 40min.
14. Brush top with the leftover beaten egg (mixed with 1 tsp water) from the dough mix. 
15. Bake in preheated oven at 180deg for 25min or till bun top turn slightly golden brown. (Every oven works differently so indicated temperature might or might not work for you.)

Wednesday, October 28, 2015

Matcha Swiss Roll Cake with Yuzu Jam

I am so loving the green tone of this roll cake!

And so...


It's the return of the swiss roll. And this time a matcha one. Have always been a fan of anything matcha and so... I naturally have packs of matcha powder stashed away in my fridge - I can make anything matcha anytime!

Cake was not well rolled and it cracked at the start of rolling.

As you know, I am not a cream lover and never like to have cream in my bakes as much as possible, so fillings for cakes will normally be substituted by jams or chocolate spread. Same thing here, I used yuzu jam for the roll cake filling. A bit of tangy sour taste with the yuzu jam but I enjoyed this roll cake all the same, over a cup of espresso coffee, or a cup of tea if you like :)


Matcha Swiss Roll Cake with Yuzu Jam

80g egg yolks (about 4 eggs)
20g castor Sugar
30g olive oil
2 tbsp tsp Japanese Matcha Powder
65gm plain flour

150g egg whites (about 4 eggs)
70gm castor sugar


Filling

Yuzu Jam


(You may use other filling, just that the lazy me, as usually tries to keep away from creaming cream so jam is my easy way out keke.)


Matcha Swiss Roll Cake Recipe

1. Preheat oven to 170 deg C. Line baking tray with baking paper, leaving about an inch of extra baking paper up the sides of the baking tray.


2. Beat egg yolks and sugar till well mixed and sugar has dissolved. Add in oil and mix well.


3. Sift in flour and matcha powder and mix well. Set aside.


4. Beat egg whites using an electric mixer under low speed till whites turn foamy. Add in sugar gradually in 3 additions and beat till slightly stiff peaks are formed.


5. Beat whites under low speed for one minute to get a smooth and fine egg white mixture.


6. Fold in the 1/3 of whites into the yolks mixture. Mix well with a hand whisk. - this is done to allow easier incorporation of the remaining egg whites when you fold in later.


7. Pour the mixture into the remaining whites and fold well using a spatula.


8. Pour into the lined baking tray and even out batter top.


9. Bake at 170 deg C for 15 minutes. (For my Rowenta oven, I baked it at 180 deg C for 22min, no preheating needs to be done.) Cake is done when the surface turn brown and springs back when pressed lightly with finger.


10. Remove lined baked cake from baking tray to cool on cooling rack with a sheet of baking paper on top.  After about 5 minutes, invert cake over and carefully peel off baking paper from cake bottom.


11.  Place a new piece of baking paper over cake and invert.  Peel off top piece of baking paper, make about 3 slits 1/3 down start of cake to allow easier rolling.  


12.  Spread yuzu jam evenly over cake with a spatula and roll up cake tightly.  Twist both ends of baking paper to secure roll cake, leave in fridge for an hour before cutting.


Tuesday, October 27, 2015

Espresso Choco Chip Mantou

Bad hazy periods like these have seriously affected me by quite abit. With an already not-too-good respiratory system, the nose just got worse with the ever increasing PSI. I cannot wait to get out of here for the fresh air man!!!

Now, bad weather not only cause me to have bad blocked nose, it has also dampened my mood to bake and cook! These steamed buns were a result of forced baking, but fortunately they still turned out well and fit for brekkie.


Wanna make them again when the weather and my mood gets better.


Espresso Choco Chip Mantou

5g Instant yeast
60g espresso, cooled (without sugar)
123g fresh milk
35g caster sugar
340g plain flour
5g butter (room temp)

3 tbsp unsweetened chocolate chips


1. Mix caster sugar with all of espresso and part of fresh milk to make 137g and stir well to dissolve sugar. Sprinkle instant yeast over remaining 46g of fresh milk and let it sit for about 2 minutes before stirring them to dissolve yeast. 
2. Sift plain flour. Place all dry ingredients into a mixing bowl, Pour in the wet ingredients and mix well to form a rough dough. Knead dough till smooth and shiny.
3. Place kneaded dough in mixing bowl and cover with clingwrap to let proof for 10 minutes.
3. Do a quick knead on the dough to remove the air then using a rolling pin, roll out dough to form an even rectangular shape with even thickness of 0.5cm and 70cm in length.
4. Trim off sides of dough to get a nicer rectangular shape, sprinkle chocolate chips over rolled dough evenly and carefully roll up dough like rolling swiss roll. About 1cm at the end of the dough, brush on some water and gently press down dough to flatten it a little. 
5.  Using a sharp knife, slice rolled up dough into 10 equal pieces. (I got 9 pieces)
6. Place baking paper under dough and leave dough in steamer to proof for 20 minutes.


7. Steam mantou on medium high heat for 8 minutes. Make sure water is boiling before placing in mantou. Place lid cover sideway for about 1 minute. Remove steamer with lid covered slideways away from stove and let cool for further 2 minutes or so to cool - this is done to prevent mantou skin from crinkling up with the sudden temperature change. Serve warm!


To freeze - Allow mantou to cool and then place in ziplock bag, press out air, zip and freeze.

Tuesday, October 20, 2015

Fried Rice with Preserved Olive Vegetable


Fried rice has always been one of my go to food whenever I do not want to eat takeaways and also am too lazy to whip up dishes. Fast and easy to whip up, no excuse not to stir fry some rice at home lor!

Okay... when Mum gives you a small tub of fried anchovies and roasted peanuts, have them as one of the sides for your fried rice and eat it. I also had a scoop of pork floss to go along with and this completed my meal.

Burp.

Be back soon. Hopefully. :)


Fried Rice with Preserved Olive Vegetable

1 bowl cooked rice
2 tbsp Chinese preserved olive vegetable
2 tbsp minced pork
2 tsp minced garlic
1 tsp light soy sauce
Fried onions, 1/2 tbsp (optional)
1 egg, beaten

1. Cook rice and set aside to let it cool. Loosen rice.
2. Heat 1/2 tbsp oil in frying pan and fry egg, scrambled form till done. Dish out and set aside.


3. Heat 1 tbsp oil. Add in minced garlic and stir fry for awhile. Add in preserved olive vege and minced pork, stir fry til minced pork is half cooked.
4. Add in cooked rice and roughly stir to mix. Add in scrambled egg, fried onions and light soy sauce. Stir fry well till fragrant. Dish out and serve immediately.

Monday, October 19, 2015

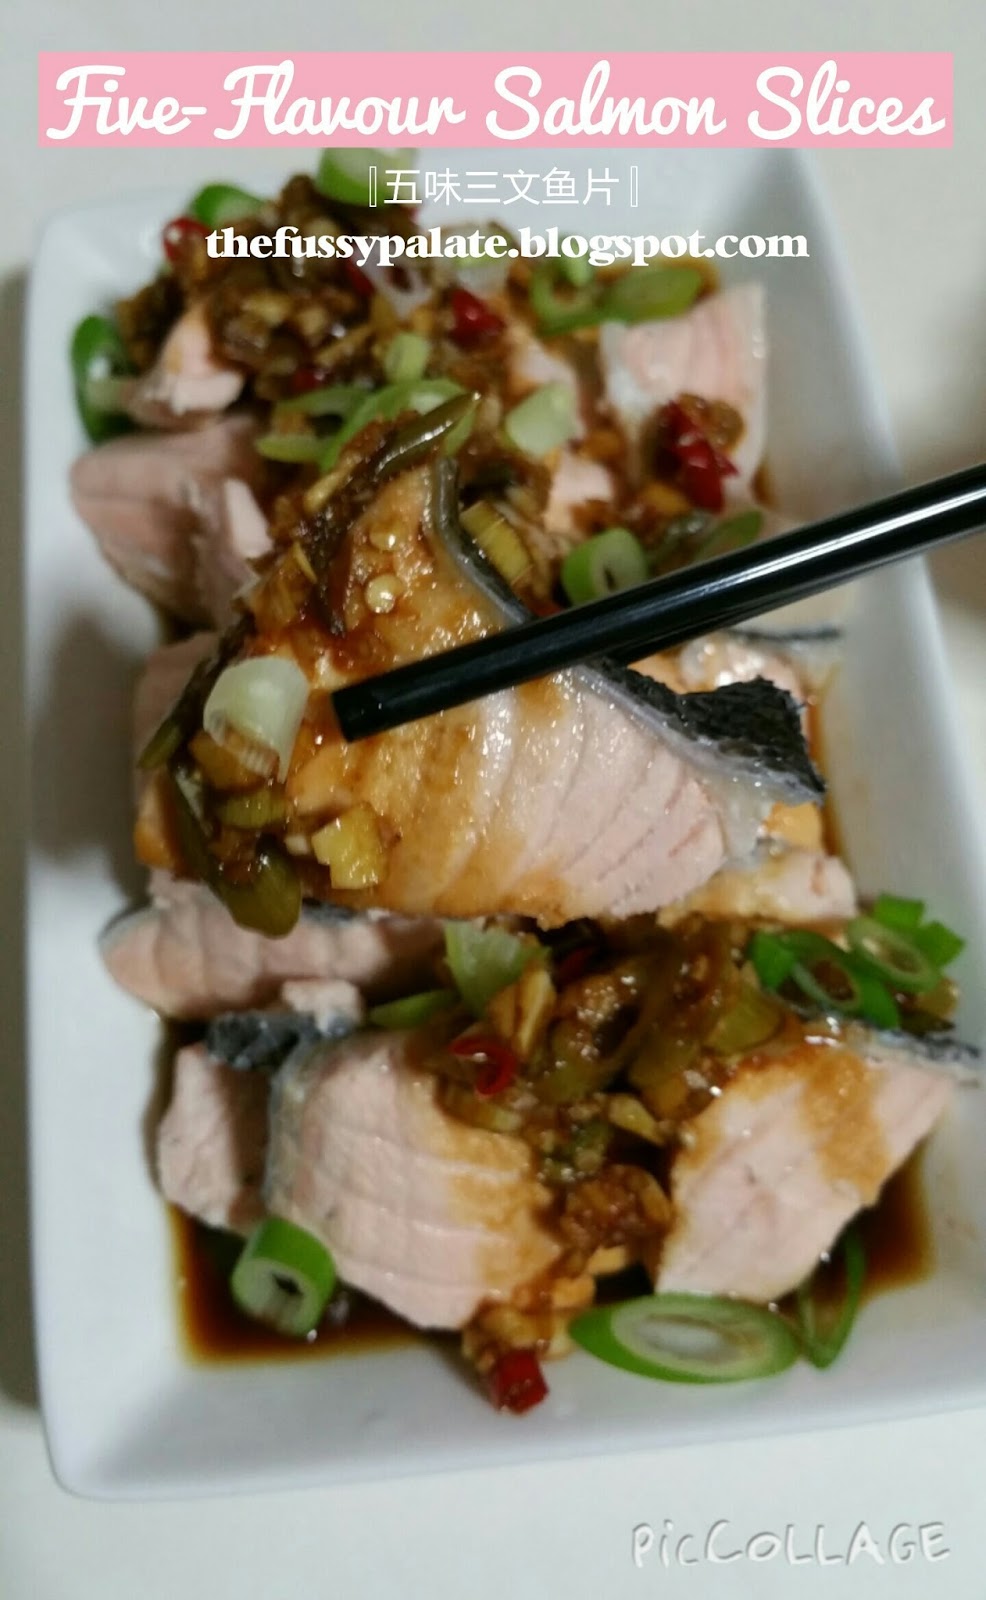
Five-Flavour Salmon Slices


If you have been keeping up with my foodie blog, you will know that I have been on a lookout for any methods possible to cook salmon.

This time, I used a recipe off a cookbook I bought some months back and substituted the fish used in the recipe with salmon fish instead and it tasted good, well at least to me :P Hubby prefer his salmon fish panfried while I like it with sauce.


This dish actually goes better with plain porridge than rice. I will cook this again anytime :)

Five-Flavour Salmon Slices
Recipe by 400 Seafood Dishes Bible

400g salmon slices
Ginger slices, 4 to 5 slices for blanching
1 spring onion, sliced to 1 inch
Adequate amount of rice wine (I did not use this)

Five-Flavour Sauce
10g minced garlic (I used 3 garlic pcs)
10g minced ginger
10g sliced spring onion
10g minced red chilli
10g chinese parsley (I did not use this)
1 tbsp black vinegar
1 tbsp white vinegar
2 tbsp sugar
2 tbsp light soy sauce (I used 1 tbsp)
1 tbsp dark soy sauce (I used 1/2 tbsp)
2 tbsp tomato ketchup
Place all seasonings into a small bowl, mix well and ready for use.
(I heat the sauce in a saucer til it comes to a boil before drizzling over the salmon slices)

1. Cleanse salmon and dry with kitchen towel. Slice to even thickness.
2. Put a pot of water to boil. Add in ginger slices, spring onion, rice wine and salmon slices and let it cook for about 2 to 3min, or till salmon is cooked.
3. Remove salmon slices and line them on a plate. Drizzle sauce over salmon slices and serve immediately.

Sunday, October 18, 2015

Wholemeal Pumpkin Buns


Got a quarter portion of an organic pumpkin when we did some marketing at JB with my mum during the recent trip there, and used them to make some healthy wholemeal pumpkin buns. If you love pumpkins, you will love this sweet buns :)


The one good thing about buns with fillings is that I do not need put some time aside for jam spreading on bread slices. All I need to do is just grab the nicely packed buns and off to work I go.

This time, I had the buns made the buns in  floral shapes and another batch in round shape with snipped cross tops.
Which do you prefer? 

Wholemeal Pumpkin Buns

Gelatinized dough

50g bread flour
35ml boiling water

1. Place flour in a mixing bowl.
2. Add hot boiling water and mix with wooden spoon to form a rough dough.
3. Cover bowl with cling film and leave dough to cool in the fridge for at least 1 hour, and up to 48 hours.

Pumpkin bread dough


150g bread flour
60g wholemeal flour
40g sugar
4g instant yeast
1/4 tsp or 3g salt

50g pumpkin puree (Steam pumpkin pcs till soft and mash with fork and leave to cool before use)
47ml cold water
30g butter, room temperature


Pumpkin Fillings

160g pumpkin puree
15g brown sugar
1 tsp cornstarch

Place all fillings ingredient into a pot and stir and cook on medium low heat till thickened. Spoon into 10 equal portions. Shape it into round balls and then cover with clingwrap, refrigerate till later use.


Buns

1. Tear gelatinized dough into smaller pieces into the bread machine. Add water, pumpkin puree and top with flour. Place salt and sugar on opposite corners of bread machine, make a small deep hole in centre of flour and spoon in instant yeast. Gently cover yeast with some flour and set BM to work. I used Function 8 for Kenwood BM250 for this step. 


2. When dough has come together and is more or less a smooth dough, add in softened butter. I restarted my BM on Function 8 again and let BM mix till well incorporated with dough and is smooth and soft. I then remove dough and hand knead till dough reaches window pane stage, where you get a thin translucent membrane when dough is stretched. (This more or less tells you that you will get soft and fluffy bread and buns!)

3. Shape dough into a ball, leave to proof for 40 min or until doubled. 

4. Punch down dough to rid excess air, then divide dough into 10 equal portions and roll it round and set aside for 5 min to let it relax for easier rolling. 


5. 
Roll out dough into a round shape and place pumpkin puree filling onto centre of flattened dough and wrap up into round dough, sealing well dough bottoms. Slightly press down and flatten dough. Place each dough on a greased baking tin. Repeat for the remaining dough. 

6. Cover with clean moist cloth and leave to proof for 40min or till doubled in size. 

7. Using a clean kitchen scissors, make 5 equal snips of about 1.5cm on sides of buns.  Brush bun tops with whisked egg yolk mixed with 1 tsp water, sprinkle some pumpkin seeds on centre of each dough and bake in a preheated oven at 180°C for 12 to 15min or till slightly golden brown. 


8. Cool on a wire rack before storing in an airtight container.

Wednesday, October 7, 2015

Cocoa Mantou

I love mantou.

Ever since I got myself a book on mantou and started making my own mantou, I said N-O No to supermarket frozen mantou. 


Knowing what goes into my food is very important to me these days. Not comfy with the idea of preservatives in my food and so I am a strong believer of almost all food homecooked, homemade and homebaked.


Got myself busy with these mantou and woo! I wished I had made more of them. They were so soft and fluffy with a tinge of cocoa fragrance in them. These fluffy little buns definitely ignited my mantou making flame once again. 


What mantou should I make next?  :P


Cocoa Mantou

5g Instant yeast
183g fresh milk
35g caster sugar
340g Hong Kong flour
20g unsweetened cocoa powder
5g butter (room temp)


1. Mix caster sugar with 3/4 of fresh milk (137g) and stir well to dissolve sugar. Sprinkle instant yeast over remaining 46g of fresh milk and let it sit for about 2 minutes before stirring them to dissolve yeast. 
2. Sift Hong Kong flour and cocoa powder. Place all dry ingredients into a mixing bowl, pour in the wet ingredients and mix well to form a rough dough. Knead dough till smooth and shiny.
3. Place kneaded dough in mixing bowl and cover with clingwrap to let proof for 10 minutes.
3. Do a quick knead on the dough to remove the air then using a rolling pin, roll out dough to form an even rectangular shape with even thickness of 0.5cm and 70cm in length.
4. Trim off sides of dough to get a nicer rectangular shape and carefully roll up dough like rolling swiss roll. About 1cm at the end of the dough, brush on some water and gently press down dough to flatten it a little. 
5.  Using a sharp knife, slice rolled up dough into 10 equal pieces. (For me, I got 8 pcs, and with the trimmed dough I divided it into 2 long portions and made them into knotted patterned mantou)
6. Place baking paper under dough and leave dough in steamer to proof for 20 minutes.


Let proof for 20min

Put to steam.


There you are. Home made mantou.

7. Steam mantou on medium high heat for 8 minutes. Make sure water is boiling before placing in mantou. Place lid cover sideway for about 1 minute. Remove steamer with lid covered slideways away from stove and let cool for further 2 minutes or so to cool - this is done to prevent mantou skin from crinkling up with the sudden temperature change. Serve warm!


To freeze - Allow mantou to cool and then place in ziplock bag, press out air, zip and freeze.


No need to defrost mantou before steaming. Just set your steamer to boil and place in mantou to steam on medium high heat for 7min. 

Saturday, October 3, 2015

Salmon Slices in Chilli Oil

During my last few day trips to JB, I got more recipes to add on to my recipe books collection! Always happy to have my hands on new books!


These are the few books that are keeping me occupied currently when I aren't on my feet baking, cooking away or busying with other housework.  Tried one of the fish recipe from the 400 Dishes Seafood Bible (400道海鲜圣经) and made this simple and yummy Salmon Slices in Chilli Oil.  Something different from the usual pan-fried, air-fried or baked salmon.  I prefer my food with some sauce!!!


Am looking forward to trying more of the other recipes on my salmon fillets!


Salmon Slices in Chilli Oil
Original recipe calls for 鲷鱼片 but I used Salmon slices instead

200g Salmon slices
1 Spring onion, cubed

Sauce
2 tsp dark soy sauce
1 tsp oyster sauce (I used abalone sauce)
1 tsp white vinegar
1 tsp + 1/2 tsp caster sugar
2 tsp chilli oil (I used 老干妈辣椒油)
2 tsp water

1. Wash, clean and dry salmon. Slice salmon into medium thick slices.
2. Make sauce by mixing all seasonings in a bowl. (Do a taste test at this point, if you want it sweeter, add 1/2 tsp more sugar, spicier, more chilli oil. Get the taste you want at this stage!)
3. Put a pot of water to boil and place in salmon slices. Scoop up with a strainer when it is cooked, about 3min later. Set salmon slices on a serving plate.
4. In a separate pot, bring sauce to boil and drizzle sauce over salmon.


5. Top with spring onion cubes and serve immediately.


Tuesday, September 29, 2015

Espresso Coffee Bread Loaf


Sunday mornings are mostly reserved for break making to "welcome" the coming working weekdays. Can say that it is a weekly habit, a therapy for me. Of cuz there are some Sundays meant for cake baking too, when I do not feel like munching bread come weekdays.

For the past weeks, I have the crave for anything espresso and I want them in my bakes! Even my milkshakes!  Hehe... I am a coffee lover alright :)


I did a bad job at trying to dislodge the bread from the loaf tin!!!


This round, I incorporated my Nespresso Espresso into my bread and had a lovely, fluffy and aromatic loaf bread.  The softness lasted for 3 days! It was good on its own, without the need for jam spreading.  Pair it with a cup of coffee and say yum :)


Espresso Coffee Bread Loaf (Pre-fermented dough method)
(makes 1 loaf)

Pre-fermented Dough
230g bread flour
1 tsp instant yeast
1/2 tsp salt
1/2 tbsp skimmed milk powder
135ml water


Dissolve yeast in water.  Add to rest of ingredients & knead until soft. Place dough in a big ziplock bag and refrigerate for at least 17 hours. The dough will expand in the bag, so make sure there is room for expansion.

Main Dough
100g bread flour
1 tbsp skimmed milk powder
1/2 tsp salt 
40g sugar 
1 small egg (lightly beaten)
40ml espresso coffee (no sugar added)
1 tsp instant yeast
30g butter (softened at room temperature)

1. Knead all main dough ingredients together (except butter), then add in pre-fermented dough piece by piece.

2. Knead as you add until the dough is soft and smooth (the dough is quite wet but should be acceptable after about 10-15 minutes of kneading) - I did the mixing of all ingredients by my bread machine.

3. Add butter and continue to knead until dough is soft, smooth and stretchable and does not stick to your fingers when pressed. - I left Step 1 to 3 to my trusty bread machine and only took over from here to knead it till window pane stage as I prefer to feel the dough and achieve windowpane stage with my own hands.  I hate mixing part as I do not like my hands getting all gooey.

4. Flour your hands before shaping dough into a ball and leave in mixing bowl.  Cover the bowl with a clean and moist tea towel cloth and let it proof for about 15-30 minutes or until double in size.

5. Punch down dough and roll dough flat into a long rectangular shape and roll dough up like swiss roll.  You may shape your dough according to your preference.

6. Grease your loaf tin with butter or oil.  Place rolled up dough in loaf tin and cover top loosely with a moist and clean tea towel cloth.  Let proof for 45 minutes or till dough has risen to 80-90% of tin. Brush top with fresh milk (room temp.).


7. Bake at 180 degree preheated oven for 25-30 minutes.  Unmould and let it cool on cooling rack.

8. Slice when cool.