Showing posts with label Pandan. Show all posts

Saturday, August 1, 2015

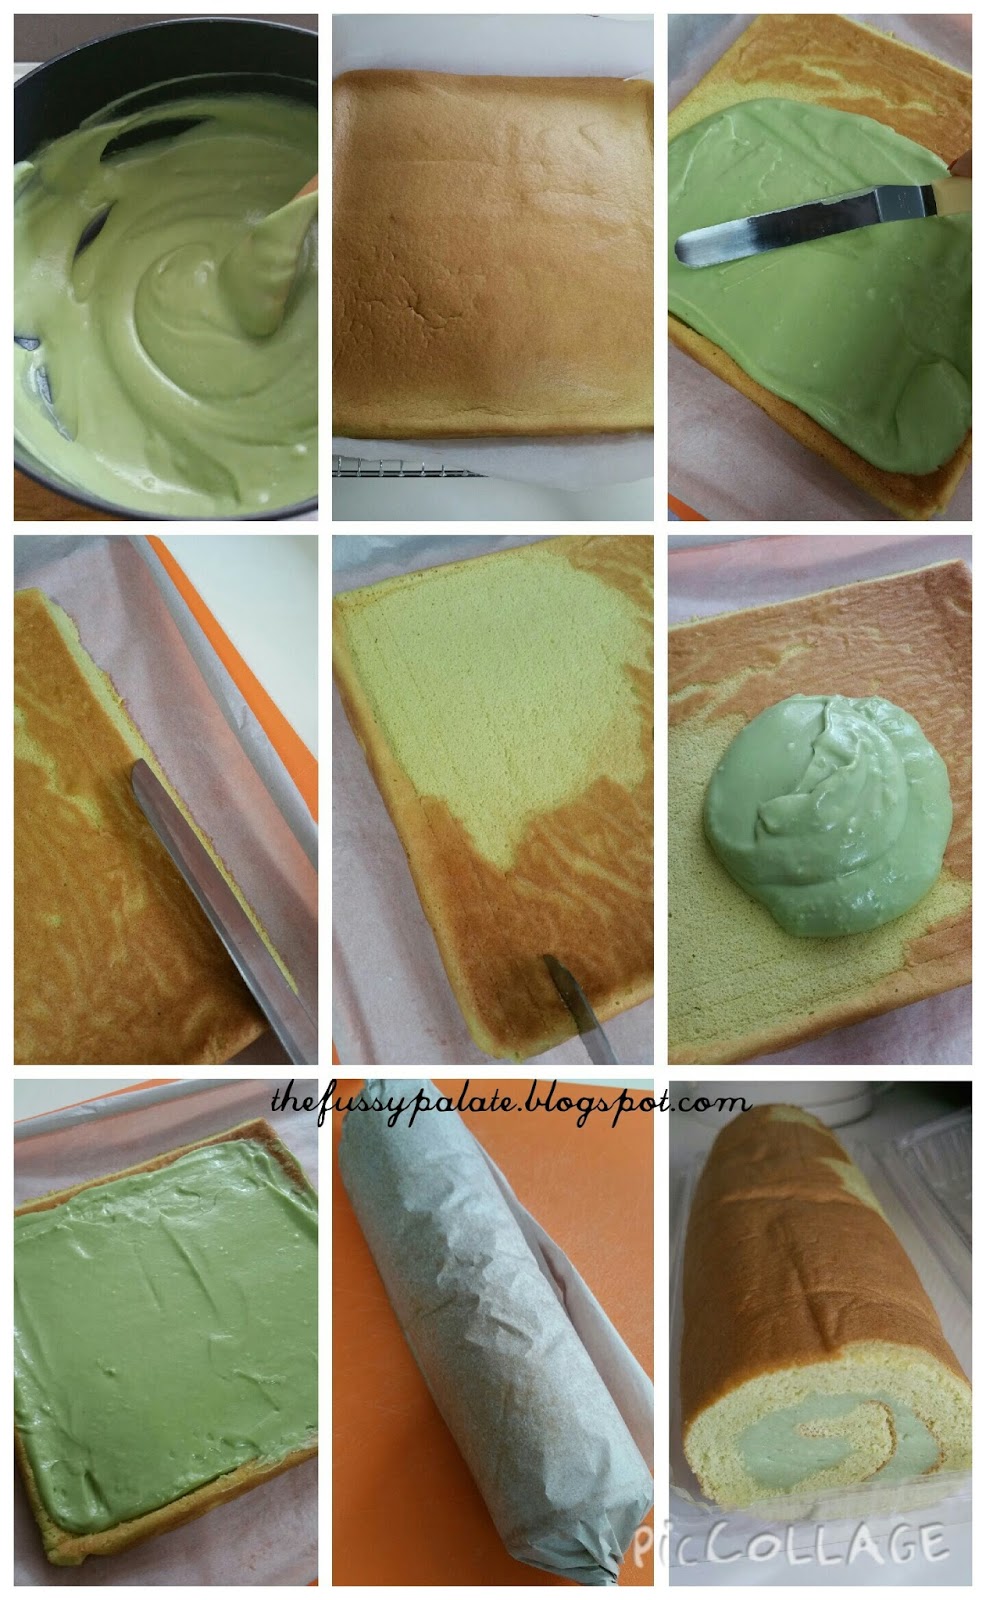
Pandan Roll Cake with Pandan Kaya Jam

Some time back a lovely lady got me a yummy kaya swiss roll from the famous Rich & Good Cake from Kandahar Street, and I was so so in love with their roll cakes from then on. 

I had always been wanting to replicate a roll cake similar to that kaya swiss roll, I thought why not try using the kaya custard we use for pandan kaya sponge cake as filling for my pandan roll cake, and so I did. 

I rolled the cake with the cake skin layer on the outside (外捲法), but did not do a good job there and a portion of the cake skin came off after I unwrapped it after refrigerating it. Looks aside, the cake was good. The pandan kaya jam filling was good when paired with the chiffon roll cake. This cake is not like the kaya swiss roll from Rich and Good Cake shop but it was okay enough for me when my crave for roll cakes come on.


Filling is a custard like kaya jam that is used for pandan kaya sponge cake, except that I spread it and rolled it inside.

This cake was made for mum since she is a pandan and kaya fan.  I am quite like mum, so I will surely make this cake again!

Oh one last note, do use fresh pandan juice for this if it is available within your country. Fresh pandan juice does make a whole lot of difference compared to using pandan essence.


Pandan Roll Cake
Recipe adapted from Copy Cake Kitchen 

A
60ml homemade pandan juice
50ml corn oil
10g sugar
pinch of salt
50g cake flour (sifted)
10g corn flour
3 eggs yolk

B
3 eggs white
35g sugar
1 tsp lemon juice (I did not use it)


1. Whisk ingredients A- pandan juice, corn oil, sugar and salt until sugar dissolve.
2. Add in sifted flour, continue to whisk. Then, add egg yolks, stir to combine. 
3. In other bowl, beat egg white,sugar and lemon juice until soft peak form.
4. Take 1/3 of egg white and use a hand whisk to mix into egg yolk batter.
5. Fold in the balance egg white with a spatula till well combine.
6. Gently pour the batter into lined baking tin (10"x10"x3"). 7. Smooth out to the corners with a scraper.


8. Bake in preheated oven at 170c for 25 minutes.
9. Once the cake done, transfer the cake to wire rack.


10. Invert the cake and gently remove the baking paper.
11. Spread Pandan Kaya filling evenly onto cake.


12. Roll it up gently and tightly, wrap and chill for 30-60 minutes.


After all the above is done, slice and nom rightaway!


Pandan Kaya filling:

Recipe adapted from Fong's Kitchen Journal with slight adjustments made

50g sugar (I used 35g sugar)
200ml water (I replaced this with 200ml fresh pandan juice)
3g agar agar powder
25g hoon kueh flour (green bean flour)
150ml coconut milk
1/2 tsp pandan paste (I skipped pandan paste and used 3 drops of green food colouring instead)
Pinch of salt


1. Boil water (replaced by pandan juice) and sugar in a small pot on medium heat till the sugar dissolves.  
2. Mix together the agar agar powder, hoon kueh flour, coconut milk, pandan paste ( replaced by green food colouring) and salt.  Pour this mixture into the pot and keep stirring till the mixture thickens.  
3. Remove from heat and continue to stir the mixture for another minute to cool down the filling.  Let it cool slightly before using.


Notes:
I blended 8 pcs of pandan leaves with 270ml water for use with the cake and filling. Squeeze the blended pandan leaves to get the excess juice. Pour the juice through a sieve to remove pandan pulps.

Tuesday, April 14, 2015

Pandan Kaya Cake 班兰咖椰蛋糕

I am back. Finally back after neglecting this space for so long.

We were away for an annual vacation. Went to Seoul and Jeju this year and we had a great time eating that 8 days away.  You did not hear me wrong. We enjoyed the food more than the shopping! And I always thought that Korea was a shopping heaven! Oh well... At least Korean food was yummy enough to make me miss Korea and wanna go back again.  Not much clothes yield but I arent too disappointed because I was prepared. I had a good stock up of my make ups and facial products though!

Jeju was a relaxed place filled with beautiful cherry blossoms. We went at the right time for cherry blossom viewings :)

Returned to Singapore with a reluctant heart and mind for I had enjoyed not working, not cooking and baking for a period, and I wished I could go on with this relaxed life for a little longer haha! Wishful thinking! I can only tell myself to come back, work and save more and plan for next trip soon. With that as a motivation, I got by that first week of post trip syndrome. Am back to the kitchen again. Still going slow, but steady :) Will be back in full swing soon (hopefully!). Do bear with me keke.


Never had the courage to try making this cake for I thought it was not easy to make. Okay... I gave that judgement just from the number of steps I saw everywhere, from recipe books to food bloggers' recipe posts. so yup... I should not have been that judgemental afterall. 

I tried after years of stopping myself from doing it.  It was really not difficult and it was delicious! 

Searched the web for a recipe that uses natural pandan extract and found Fong's Kitchen Journal. It was what I wanted and straightforward enough for the blur me to understand keke!


Pandan Kaya Cake
Recipe by Fong's Kitchen Journal

Sponge
(A) 4 eggs + 80g fine sugar + pinch of salt
(B) 100g plain flour, sifted
(C) 30g melted butter + 50g corn oil + 20g pandan juice* + 1/2 tsp pandan paste (mix together).


Method
Whisk (A) at high speed till stiff (the eggs would be tripled in volume).  Fold in plain flour in batches and follow with the melted butter mixture.  Fold the batter well and pour into a greased and lined 8" round pan.  Bake in preheated oven of 160C for about 45 minutes.  Cool the cake and slice into 3 layers.


Kaya filling


400ml pandan juice* + 50g butter + 120g fine sugar
250g packet fresh coconut milk + 150g water, mix together
70g hoen kwe flour
2 tsp instant jelly powder
1/4 tsp salt
1/2 tsp pandan paste (optional)
2 to 3 drops of yellow food colouring(optional)


* After washing the pandan leaves (about 7 to 8 leaves), warm them briefly in a microwave oven and cut into small pieces.  Blend the leaves with about 500ml water.  Sieve the pandan juice and discard the leaves.  Use about 20ml for making the sponge and the remaining for making the filling.

Method


1) Combine pandan juice, butter and sugar in a pot and bring to boil.
2) Mix coconut milk, water, hoen kwe flour, instant jelly powder, salt, pandan paste and yellow colouring together.  Pour this mixture to (1), stir and cook till mixture thickens.
3) Remove from heat and let the mixture cool slightly before pouring onto sponge.


To assemble


1) Place a slice of cake into a cake ring and pour 1/3 of the kaya filling onto the cake.  Repeat layering of cake and kaya filling (2x).  
2) Cool the cake first before placing in the fridge to set.


3) Remove cake from cake ring and coat the sides with dessicated coconut (I used freshly grated coconut, add 1/4 tsp salt and toast in an ungreased pan till dried). - I left out the dessicated coconut deco. (I forgot to line the baking tin and have some hangovers at the side so that I can just remove the cake when ready to serve. I tried my luck by turning it over and fortunately no damage to the top kaya layer - pls do not be so blur like me!!)

Monday, March 2, 2015

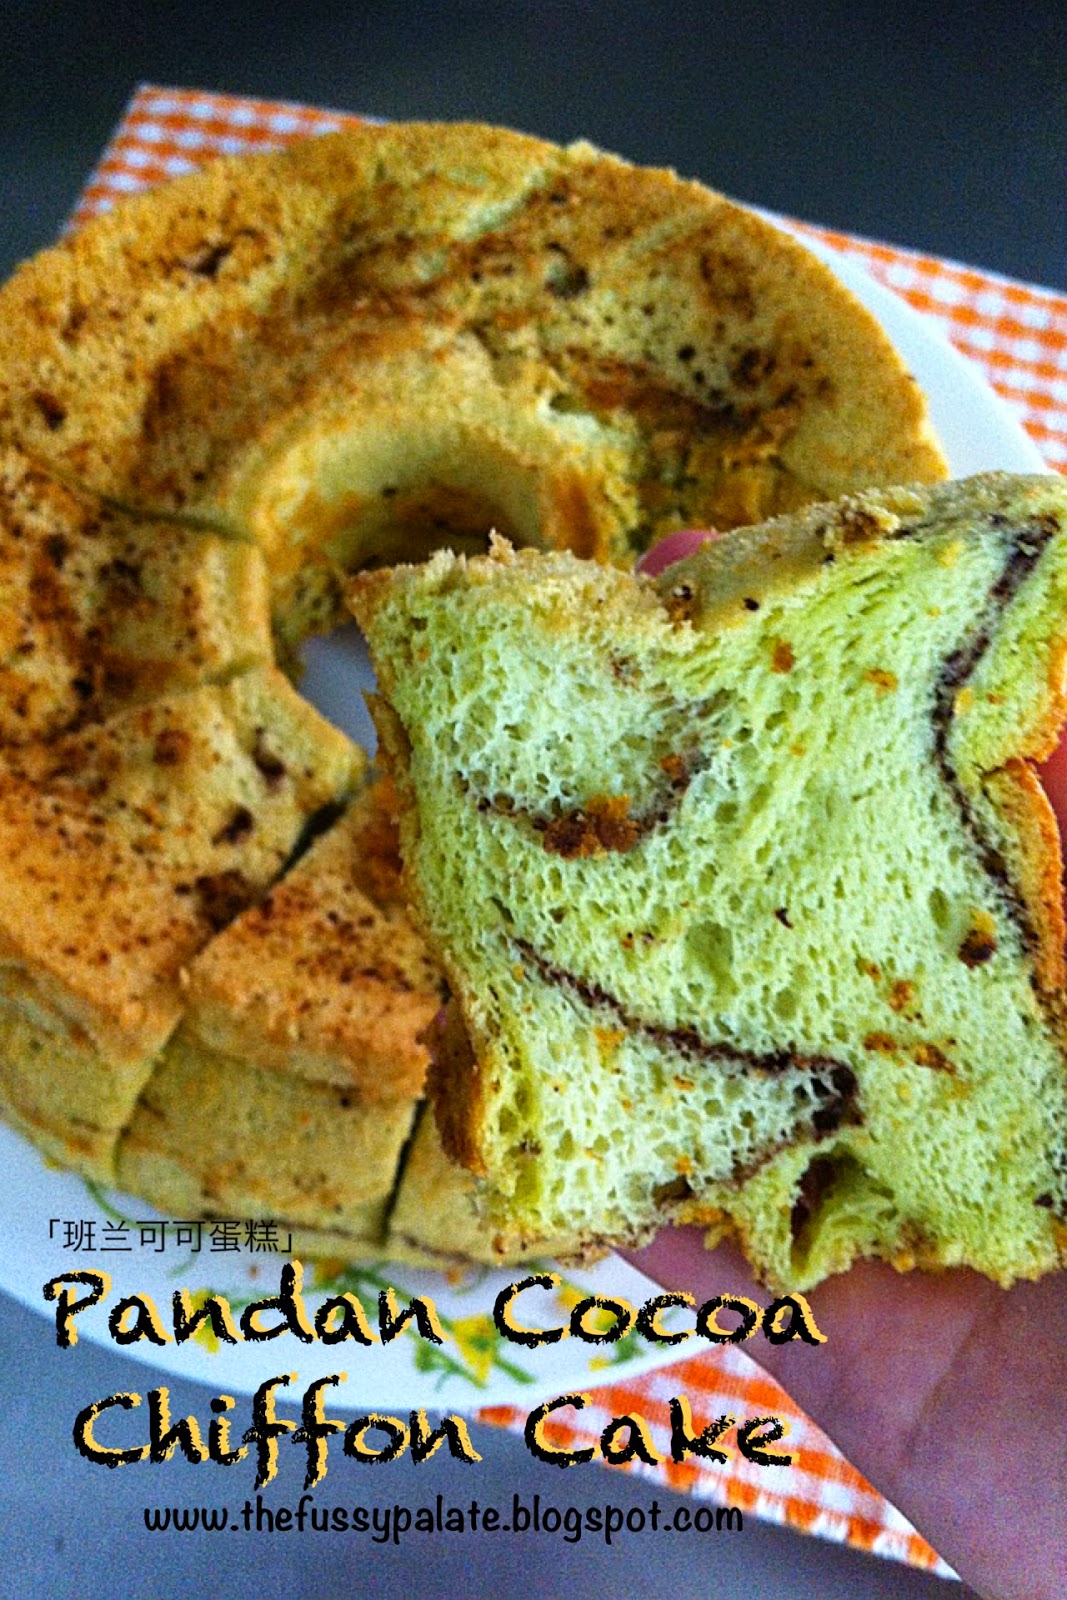
Pandan Chiffon Cake 班兰可可戚风蛋糕


Not easy to get yummy pandan chiffon cakes from bakeries nowadays. Pandan chiffon cakes are made right only with fresh pandan extract and I somehow feel not many bakeries use real pandan juice anymore. Easy way out is to use pandan essence but I never like artificial tasting pandan cakes, hence I prefer baking my own pandan chiffon cakes these days. 

Mum loves eating my chiffon cakes and I always deliver a portion of it to her when I bake them. Mummy always cook yummy food for us. I wanna bake her favourite stuff for her! 

This time, I used Cherry Potato's Pandan Chiffon cake recipe but made a slight change to turn it into a Pandan Cocoa Chiffon Cake instead. Call me a greedy one but I got the best of both the pandan and cocoa taste in 1 cake :) Greedy me.


Pandan Chiffon Cake
Recipe from Cherry Potato

(A):
5 Egg yolks
30ml Pandan juice
120ml Coconut milk
80ml Corn oil
2tbsp Water

(B):
120gm Cake flour
60gm Sugar

(C):
5 Egg whites
1 tsp Cream of tartar
60gm Sugar

Cocoa powder


1. Mix all ingredients (A) into a bowl till well.


2. Fold in sifted flour and sugar, mix well. Set aside.
3. Whisk egg whites and cream of tartar until frothy.


4. Gradually add in sugar and continue whisk until stiff.
5. Fold the above into egg yolk mixture, mix well with spatula.


6. Pour batter into a 9" ungreased chiffon tube pan. (I poured in 1/3 of the batter into the chiffon tube pan, sifted a thin layer of cocoa powder all round the top of the pandan batter, pour 1/2 of remaining batter over cocoa powder. Sift another layer of cocoa powder again over pandan batter and pour remaining batter in. You may sift another layer of cocoa powder on the top or leave it plain.)


7. Bake at preheat oven 170'C for 50-55 minutes till done.
8. Remove from oven and invert cake to cool.


Tuesday, January 27, 2015

Avocado Gula Melaka Smoothie 鳄梨椰糖奶冰沙

Are you an avocado smoothie fan? I sure am! I particularly like the avocado gula melaka smoothie sold at Alexandra Food Market, and would surely get a glass of it to ease my never-ending avocado smoothie crave.


It has been sometime since I last had my avocado gula melaka smoothie fix, and I thought it is about time I tried blending this smoothie at home. And so I went avocado shopping at the supermarket. Got 3 of the buttery fruits!

Honestly speaking, I have tried to replicate this smoothie drink at home for several times and have never got anywhere near the ones sold at Alexandra Food Market. This time, I decided to melt gula melaka with water and some pandan leaves. I did not do this the last few times when I DIY the smoothie at home. I merely used melted gula melaka, fresh milk and some condensed milk as per friend's recommendation, which did not turn out to my liking. This time, I "concocted" my own avocado gula melaka smoothie and I simply love it! Hubby who also adores this drink gave a thumb's up. Taste and smell of the blended goodness is so so near to the food centre's avocado smoothie standard.

I am gonna blend this yummy smoothie again! No need to travel that far for my favourite drink anymore! Yay!!!! =)


Avocado Gula Melaka Smoothie 
2 ripe avocados
140ml milk
3 tbsp gula melaka syrup
2 handful of ice cubes

Gula Melaka syrup
100g gula melaka
40ml water
4 pcs of pandan leaves, knotted


Place gula melaka, water and knotted pandan leaves into saucepan and let gula melaka melt. Stir well. You may use a spatula to gentle press down pandan leaves and stir about so that gula melaka syrup will be infused with pandan fragrance.

Pour gula melaka syrup through sieve to rid bits of residue. Ready to use.

Smoothie
1. Half avocados and scoop out fruit flesh using a spoon and place into blender.
2. Add in milk, gula melaka syrup and ice cubes. Place on blender cover and blend into smoothie. If smoothie is too thick, add in more ice and blend. You may do a taste test, if smoothie is not sweet to your liking, add in more gula melaka syrup accordingly. Blend well. Serve with or without ice cubes.

Sunday, December 21, 2014

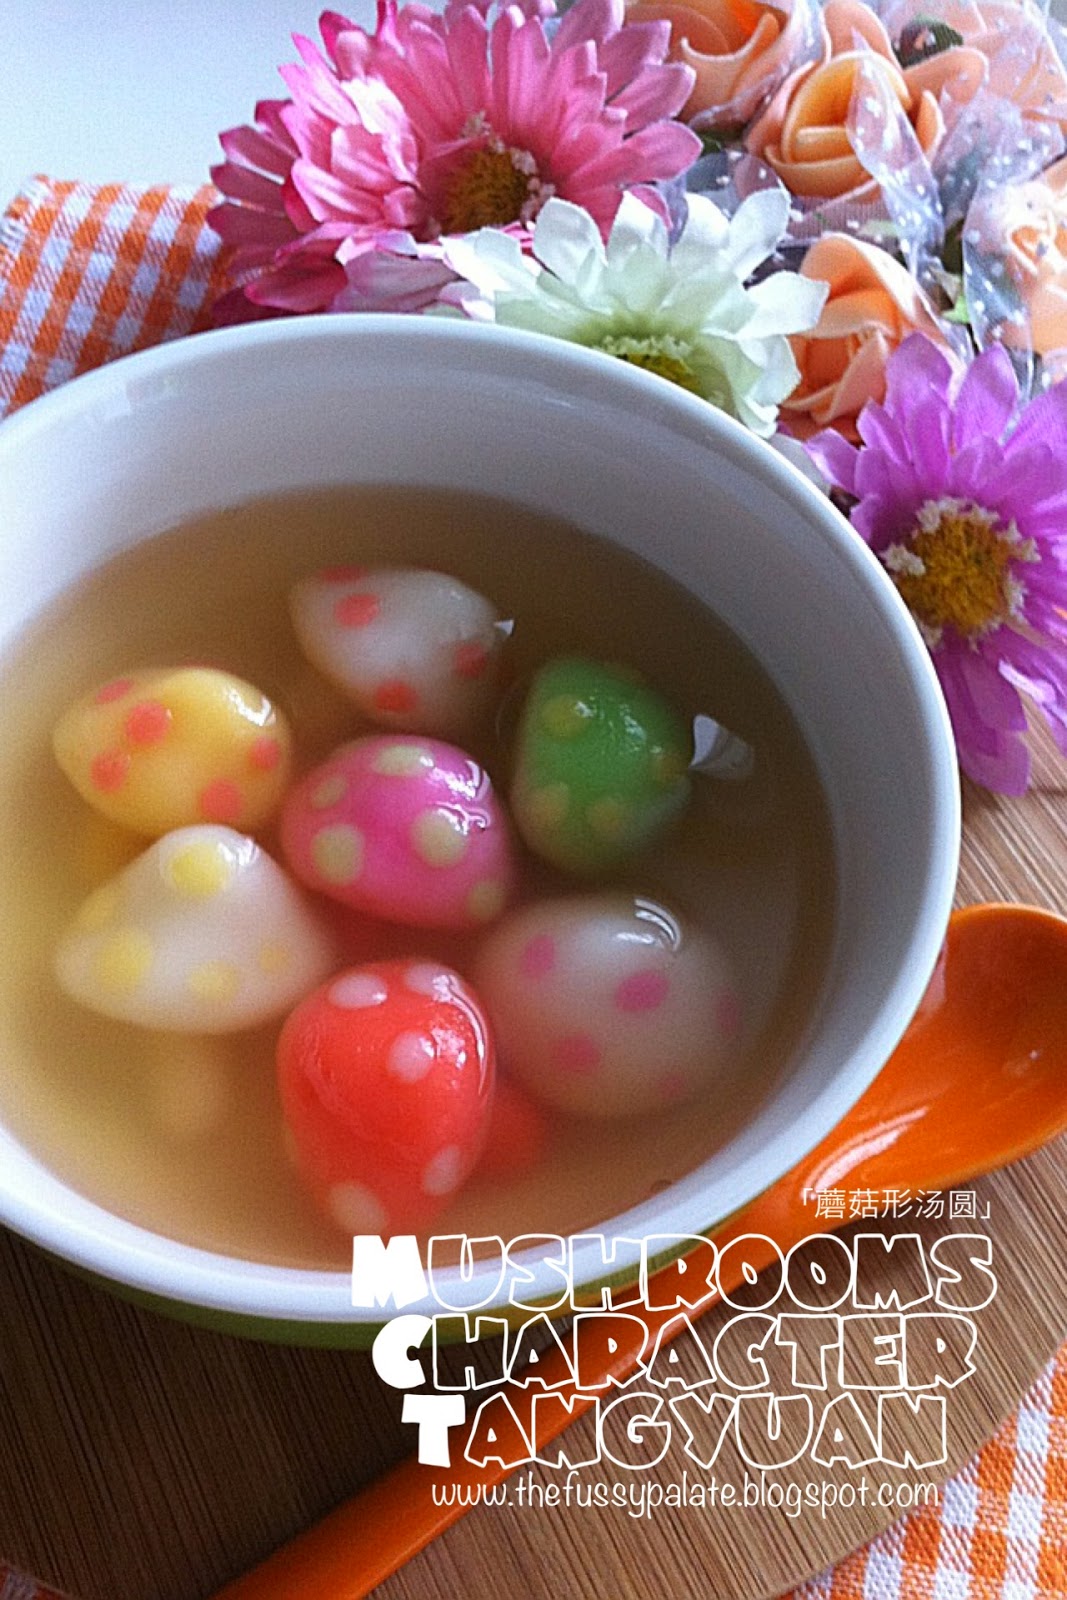
Mushrooms Character Tangyuans (Glutinous Rice Balls)

Tomorrow is Dongzhi (Winter Solstice). Have you made your tangyuan yet?  Did you make your tangyuan in the usual round shapes? I did them in round little balls as well as into cute little mushrooms.  Yes! You heard me right! Mushrooms shaped tangyuan? Who said tangyuan needs to be yuan yuan (round round) ones?


Which mushroom do you like best?


I like the white and yellow one most!


Last year I made marbled tangyuans and I thought they were too normal. I wanted to inject some creativity into my glutinous rice balls this year, hence made these. Hubby said the mushrooms shaped tangyuan looked cute but seemed inedible because they are too colourful, and that made them looked like some poisonous mushrooms. Hahaha! I ate them anyway!


Mushroom Shaped Tangyuan (Glutinous Rice Balls)

Desired amount of Glutinous rice flour

Enough water to be mixed with glutinous rice flour to form a pliable dough that could be rolled into small balls, yet is not too dry to touch and does not crack when rolled.

3 or 4 food colourings - your preference (adequate drops of colours for each portion of dough - remember that less is more, start with 1 or 2 drops first, add on if dough colour does not turn out to your liking)

5 to 6 Pandan leaves (torn into 2 strips each, fold whole bunch and gently secure with 1 piece of pandan leaf)

Brown sugar or caster sugar, to taste

1 or 2 slices of ginger, slightly flattened - optional

Water (for cooking)


1. Place desired amount of glutinous rice flour into a bowl, add some water to mix well with a rubber spatula. Add in more water if unable to form dough. If too much water has been added and mixture turns sticky, add some glutinous rice flour to dry out mixture and to form a pliable dough. Dough is ready for use when it is smooth and easy to knead without crumpling and cracking.


2. Divide dough into equal number of portions. Add in some drops of food colourings into each dough portion and mix well with rubber spatula. For me, I divided dough into 5 portions and used 3 food colourings - red, yellow and green. Made an orange dough with a drop of red and yellow food colouring mixed. Left 1 portion of dough white (without food colouring).
3. Roll out a small portion of preferred colour dough round and shape it into wild mushroom shape. Roll out little round dough with a different colour, flatten gently and gently press it on mushroom head. Repeat the same for other mushroom shaped glutinous rice balls.


4. Put adequate amount of water into pot, place in pandan leaves and bring to boil till slight pandan leaves fragrance is out - this is the soup base.
5. Add in brown sugar and stir to dissolve.
6. Gently drop shaped glutinous rice dough into soup base and stir gently to prevent it from sticking to base of pot. Lower to medium heat and let glutinous rice balls cook.  They will float when cooked.


Made some into the usual little colourful balls


7. Turn off fire and serve.

Note:
The above method is my lazy way of cooking tangyuan. If you do not like cloudy soup base due to cooking the tangyuans in them, you can cook them in a separate pot and spoon in the sweet soup over the tangyuan.

Wednesday, December 10, 2014

Pandan Kaya Deco Roll Cake

In my previous post I made some Kaya jam in a spur of moment, and I knew what to pair the jam with! 


Pandan roll cake or swissroll as most would call it - I made it last night.  Used the Kaya jam for the filling and it was yummy!  Pandan and kaya never fail to please the palate. 

Can you make out Little Twin Stars' faces?
I'll do better next time!

Can you spot the broken portion of the cake?
Failed attempts never fail to make me feel bad for days lor...

I had wholeheartedly doodled Little Twin Stars as part of the deco for the roll cake, wanting to transform my roll cake into a piece of food art but I failed terribly this time.  Outline of the drawings came off together with the baking paper when I peeled it off the cake.  Had I not pipe it thick enough?  Or did I not bake the drawings long enough?  I definitely need much much more practice to get it right or I shall just stick to baking plain swiss roll cakes!

As if the deco part was not bad enough, my cake just had to crack when I rolled it!  How lucky.  Oh well, at least the softness and fragrance of the cake paired with the kaya jam filling  much made up for all the "mishaps".  I wasn't that unlucky afterall :)  Life already sucks, I need to learn to be more positive :) 
Pandan Kaya Swiss Roll
Recipe by Lirongs
80g plain flour
20g corn flour
1 tsp baking powder
1/4 tsp salt
4 egg yolks
50g castor sugar (I cut down sugar to 35g)
11/2 tbsp pandan juice
90g coconut milk (I used Kara brand coconut milk)
30g canola oil
1/4 tsp pandan paste (optional)

4 egg whites
1/8 tsp cream of tartar
50g castor sugar (I cut down sugar to 30g)
80-90g kaya (own preference)

1. Line all the side and bottom of the 35 x 27 x 3-cm tin with baking paper. (I sued a 10inch by 10inch tin)
2. Sift the flour, baking powder and add the salt. Set aside.
3. Whisk the egg yolks and castor sugar until sugar dissolve. Add oil, pandan paste, coconut milk and flour ingredients mix till smooth.
4. Whip egg whites until foamy and add in the cream of tartar, following by the sugar. Continue whipping until stiff peak. (I then spooned out 2 tbsp of yolk mixture and 4 tbsp of meringue into a separate bowl, add in 2 tbsp cocoa and mix well. Pour cocoa batter into piping bag, snipped off end of bag, and pipe desired pictures on lined tray. Put to bake at 200deg C for 2 minutes or till firmed.)
5. Mix the meringue with egg yolks mixture until well incorporated. - I folded in meringue into yolk mixture and pour batter into tray and over baked drawings)
6. Pour it into the lined tin and bake it in a preheated oven at 200C for 15 minutes. (I dropped tin on table top to get rid of excess air bubbles before putting it to bake)
7. Unmould it immediately when done. when it is cool spread the kaya on the cake and roll it up.
8. Leave it in the fridge for 1 hour. Remove from fridge slice and serve.

Tuesday, December 9, 2014

Homemade Kaya Jam

Egg prices have been on the rise recently but that is not deterring me from baking!  There are just so so SO many things in queue now that I want to bake and try to cook.  24 hours a day is never enough, for me!

Back home yesterday after work, I had no plan to cook, bake or make anything.  I just wanted to bathe, have dinner, laze on my comfy sofa and watch TV (and maybe read up food blogs and bookmark any interesting recipes).  I did kept to my plan until I came across this one recipe that jotted me up.  I had to do this - the kaya jam!  


The jam went right into a cleaned glass bottle.
I am sold. I could make these anytime when I feel like it.
No more jams with those unhealthy preservatives!


I had all the 5 ingredients that were called for in the recipe and I had no reasons to sit and wait till the next time to try this out.  All I need was just 30 minutes all-in-all?  I managed to convinced myself and I was back in my little kitchen in no time.  So much for planning to laze and rest.  I can only say that some things in life do not go according to plan :P 


Hubby came by into the kitchen and asked what was I doing.  Kaya jam was my answer to him and he gave the "Oh!  Wow!" answer and sink back into his sofa.

In merely 30 minutes' time, I showed Hubby what I had made and he was impressed.  Homemade Kaya jam, made at the comfort of my home. 


My dear Hubby asked me to make some plain white bread to go along with the homemade Kaya jam.  Okay, but his white bread has got to wait - I already have something that I wanna make to pair with those homemade Kaya jam!


Homemade Kaya Jam

Recipe by JewelPie

45g Palm sugar / gula melaka
200ml Coconut milk, undiluted (I used Kara brand coconut milk)
4 to 5 pieces of Pandan leaves
4 egg yolks
3 tbsp sugar (I used brown sugar)

1. Whisk egg yolks and set aside. 


2. In a small pot, pour in coconut milk and palm sugar. 


3. In a low heat, melt palm sugar. Stir throughout.
4. Add pandan leaves and another 3 tbsp sugar into the pot.  Cook in high heat.  Stir until sugar is melted and coconut milk bubbles.
5. When flavoured coconut milk is hot, turn down the heat.  With one hand, slowly pour it into egg yolks and another, whisk the egg yolks. 

I tied the pandan leaves and squashed it a little to bring out some of the pandan fragrance before adding it into the coconut milk solution.

How the jam solution got from watery state to the thickened jam form. This change took roughly 10 minutes.

6. Pour egg yolks back into the pot.  Let it simmer and stir throughout.  The solution will thicken.  It should take about 10 minutes.  If it's not sweet enough, you can add more sugar. (I did not have to add more sugar because the jam was sweet enough)
7. Discard pandan leaves with a pair of chopstick and tongs.  The kaya would be sticking on the leaves, remove them with chopsticks.
8. Transfer to a bottle.  Let cool, cover and refrigerate.  It should keep up to a week or longer.

Notes:
- Use fresh coconut milk if you can.  It tastes much better.
-  To ensure that it can be kept longer, sterilise bottle with hot water and use a clean spoon to scoop the jam.