Showing posts with label Cocoa. Show all posts

Wednesday, February 24, 2016

Marble Cake

Skipped the CNY goodies baking this year because I wanted a good rest. Excuse it was not. I had slogged myself silly the past years with goodies baking and felt really tire out (but happy and satisfied of cuz!) when the baking project wrapped up, hence I decided a break will do me good for this year. All these explains why no CNY goodies appeared in this space.  Next year then :)

Wanted to start my new year with a slower and more relaxed pace, so I took a short break from food blogging.

Here is a cake which I baked some time back but stayed in my draft till now :)


Now that I am back, I wanna share this yummy marble cake recipe by Rasa Malaysia.  A simple but yummy cake and I am glad I tried baking this.


Do give it a try if you also have a love for marble cake like I do! :)


Marble Cake
Recipe by Rasa Malaysia


2 sticks (220g) unsalted butter, at room temperature
7 oz (200g) plain flour/all purpose flour
1 teaspoon baking powder
7 oz (200g) fine or powdered sugar (confectioners sugar or icing sugar) - I reduced to 160g as my Hubby and I do not like sweet tasting cakes
4 eggs
1/2 tsp salt
4 tablespoons fresh milk
1 teaspoon vanilla essence
2 tablespoons cocoa powder
Preheat the oven to 375°F (190deg C). Lightly grease the pan with some butter.
Mix the flour and the baking powder together and sieve. Add in salt and mix well. Set aside.
Use an electronic beater to mix butter and sugar until well combined or pale yellow in color. Add in the first egg. Beat well after each addition of egg until creamy. Scrape down the sides and add in vanilla essence and fold in the flour into the mixture and mix well. Finally, add in the milk.
Divide the batter into two portions. Stir the cocoa powder into one portion and mix well. Transfer the plain batter into the greased baking pan. Shake it lightly to distribute evenly. Pour the cocoa batter in the middle of baking pan, and lightly swirl the cocoa batter with a butter knife. I usually do the “S” shape with the butter knife a couple of times. Do not overmix.


Bake until golden brown and cooked, about 40 minutes. Insert a cake tester in the middle of the cake to test doneness. Remove it from the oven and let cool on the wire rack for another 5 minutes. Remove from the pan and serve immediately.

Sunday, November 29, 2015

Avocado Cocoa Smoothie


Here's something for a hot Sunday :) Something cold, creamy and chocolatey!!!  My first try at making this drink and it was quite yummy I must say, except that I could not taste much of the avocado - it helped to only thicken the drink. Call this a chocolate smoothie or avocado cocoa smoothie? Try and decide for yourself :)


Avocado Cocoa Smoothie
Serves 2

1 ripe avocado
1 tbsp honey
360ml fresh milk
1 tbsp unsweetened covoa powder
8 ice cubes

1. Place all ingredients in a blender and blend away.
2. Do a taste test. Add more honey to suit your own taste bud if the smoothie is not sweet enough. Likewise, add more milk if you want it more diluted.
3. Pour into serving glasses and serve rightaway.

Wednesday, October 7, 2015

Cocoa Mantou

I love mantou.

Ever since I got myself a book on mantou and started making my own mantou, I said N-O No to supermarket frozen mantou. 


Knowing what goes into my food is very important to me these days. Not comfy with the idea of preservatives in my food and so I am a strong believer of almost all food homecooked, homemade and homebaked.


Got myself busy with these mantou and woo! I wished I had made more of them. They were so soft and fluffy with a tinge of cocoa fragrance in them. These fluffy little buns definitely ignited my mantou making flame once again. 


What mantou should I make next?  :P


Cocoa Mantou

5g Instant yeast
183g fresh milk
35g caster sugar
340g Hong Kong flour
20g unsweetened cocoa powder
5g butter (room temp)


1. Mix caster sugar with 3/4 of fresh milk (137g) and stir well to dissolve sugar. Sprinkle instant yeast over remaining 46g of fresh milk and let it sit for about 2 minutes before stirring them to dissolve yeast. 
2. Sift Hong Kong flour and cocoa powder. Place all dry ingredients into a mixing bowl, pour in the wet ingredients and mix well to form a rough dough. Knead dough till smooth and shiny.
3. Place kneaded dough in mixing bowl and cover with clingwrap to let proof for 10 minutes.
3. Do a quick knead on the dough to remove the air then using a rolling pin, roll out dough to form an even rectangular shape with even thickness of 0.5cm and 70cm in length.
4. Trim off sides of dough to get a nicer rectangular shape and carefully roll up dough like rolling swiss roll. About 1cm at the end of the dough, brush on some water and gently press down dough to flatten it a little. 
5.  Using a sharp knife, slice rolled up dough into 10 equal pieces. (For me, I got 8 pcs, and with the trimmed dough I divided it into 2 long portions and made them into knotted patterned mantou)
6. Place baking paper under dough and leave dough in steamer to proof for 20 minutes.


Let proof for 20min

Put to steam.


There you are. Home made mantou.

7. Steam mantou on medium high heat for 8 minutes. Make sure water is boiling before placing in mantou. Place lid cover sideway for about 1 minute. Remove steamer with lid covered slideways away from stove and let cool for further 2 minutes or so to cool - this is done to prevent mantou skin from crinkling up with the sudden temperature change. Serve warm!


To freeze - Allow mantou to cool and then place in ziplock bag, press out air, zip and freeze.


No need to defrost mantou before steaming. Just set your steamer to boil and place in mantou to steam on medium high heat for 7min. 

Saturday, August 8, 2015

Chocolate Roll Cake with Nutella filling

Currently on a 10 days break before starting on my new job,  I have lots of time on hand to spare. Catching up on the hours of sleep that I have lost, prepping food,   cooking dinner as well as prepping breakfast for Hubby. I am so enjoying this period! Counting down to the days I get back to work again, if only time could stay still haha!

Now, you are in for some eye feasting here. I made my first ever chocolate roll cake and it was a nice one.


If you are a chocolate lover, you will love this cake. Chocolate cake with nutella filling, convinced? Nothing can really go wrong with Nutella actually. Heehee!

Will make this cake again because I love chocolate cake :)

Anyway, Happy Golden Jubilee Weekend to All! Have a wonderful long weekend break with your family and loved ones :)


Chocolate Roll Cake with Nutella filling


20g cocoa powder
40g hot water
60g egg yolks (about 3 big eggs, or 4 small eggs)
50g caster sugar
50g canola oil
15g milk + 15g espresso coffee, without milk/sugar (can just skip this and use 30g milk if no coffee. I use coffee to intensify the chocolate flavour and taste.)
75g plain flour

130g egg white
55g caster sugar

1. Mix cocoa powder with hot water amd stir well to form a thick smooth chocolate paste. Set aside.


2. Whisk egg yolk and sugar till well mixed and sugar is dissolved.  Add in canola oil, milk and espresso coffee and whisk to combine.


3. Add in chocolate paste and mix well with the egg yolk mixture.
4. Sieve plain flour into egg yolk mixture and whisk till combined.


5. With an electric mixer, beat egg whites till foamy. Add in caster sugar in 3 additions, making sure each addition is well mixed before adding more. Beat till stiff peaks form.

6. Place 1/3 of egg white into yolk mixture and fold in gently with a spatula or a whisk.
7. Fold in remaining egg whites in 2 additions till just incorporated. Make sure not to over fold and deflate the chiffon mixture.
8. Pour chiffon mixture into lined tin (10"×12"),  use a scraper to spread out and level mixture.


9. Put to bake in preheated oven at 180deg C for 12 to 15min or till done. (I baked 180deg, 21min in my Rowenta oven) To test done-ness, when cake springs back and makes a "sss" sound when pressed, it is done.
10. Remove and place on cooling rack. Place a new baking paper over top of cake and flip over to other side of cake. Remove baking paper and let it cool slightly before  rolling. You can choose to roll cake on either side of the cake.
11. Slice off end of swiss roll to form somehwat 45deg angle so that when cake is rolled till the end, it gets tucked nicely underneath. At the front of the cake where you will start the rolling, make 2 horizontal cut gently on the cake to allow easier rolling. Take care not to slice through cake.

12. Spread your favourite fillings and start rolling! (I used the all-time favourite Nutella spread)
13. Wrap rolled cake in baking paper and leave in fridge to set its shape for about 45min before slicing.


I prefer leaving the roll cake out till nutella filling has softened a little before eating.

Monday, March 2, 2015

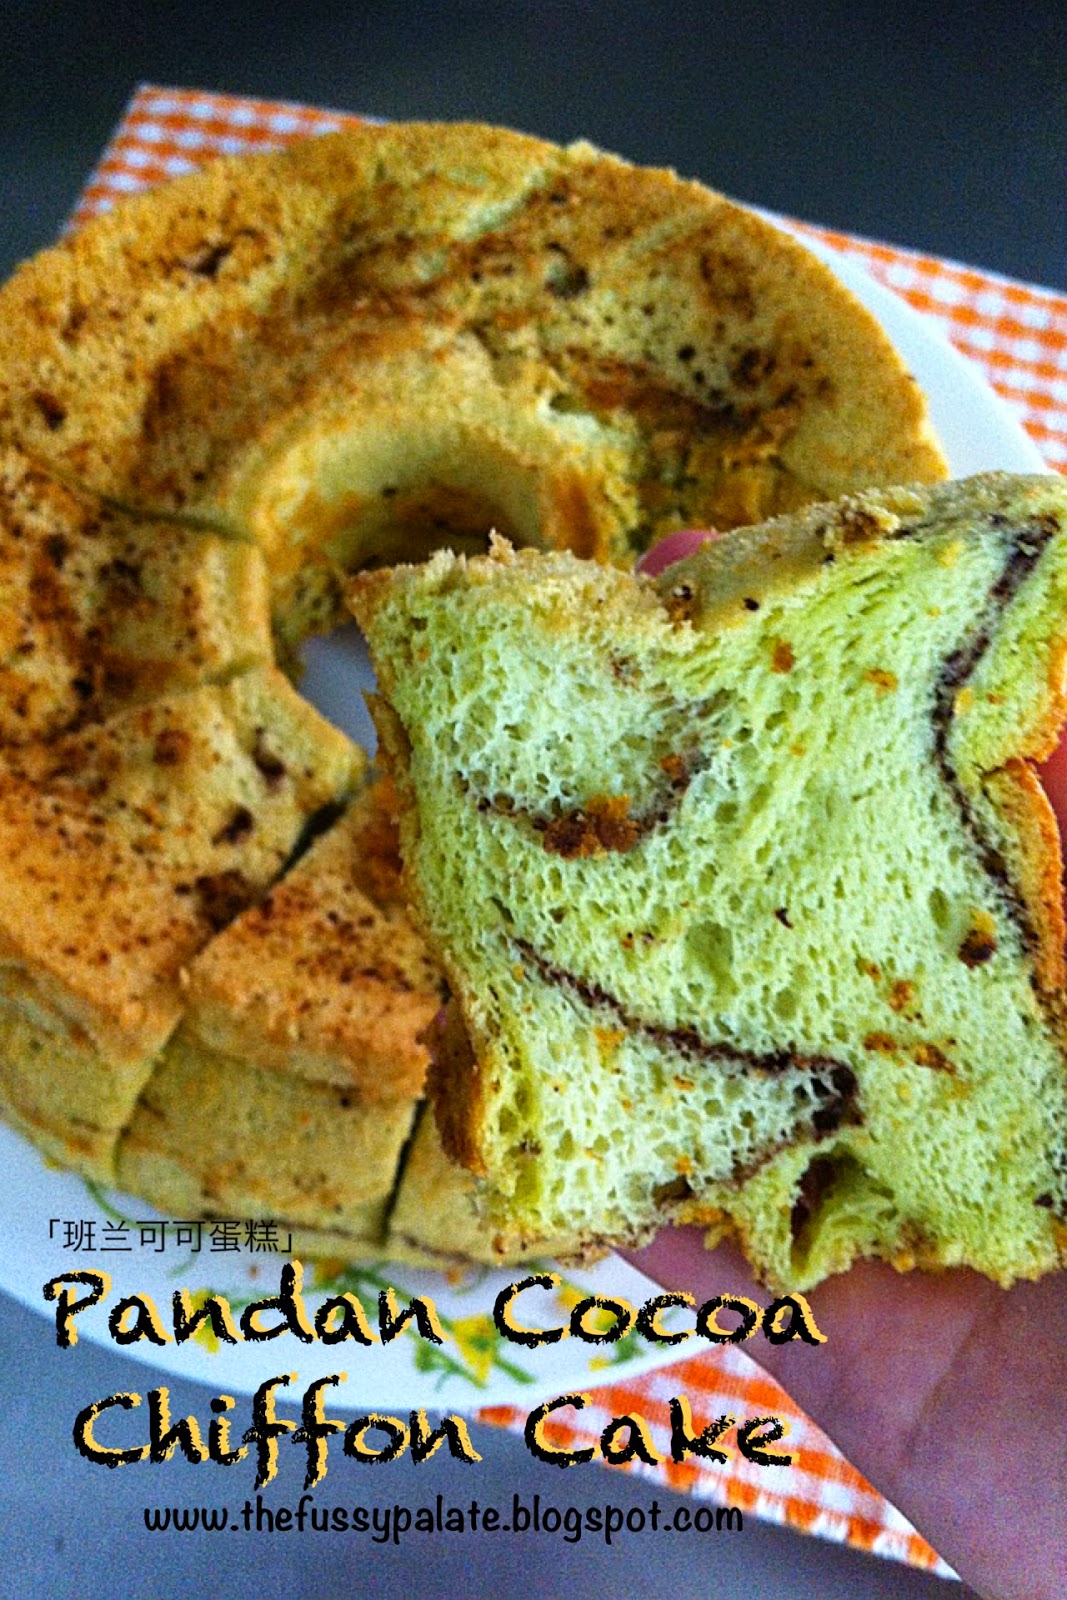
Pandan Chiffon Cake 班兰可可戚风蛋糕


Not easy to get yummy pandan chiffon cakes from bakeries nowadays. Pandan chiffon cakes are made right only with fresh pandan extract and I somehow feel not many bakeries use real pandan juice anymore. Easy way out is to use pandan essence but I never like artificial tasting pandan cakes, hence I prefer baking my own pandan chiffon cakes these days. 

Mum loves eating my chiffon cakes and I always deliver a portion of it to her when I bake them. Mummy always cook yummy food for us. I wanna bake her favourite stuff for her! 

This time, I used Cherry Potato's Pandan Chiffon cake recipe but made a slight change to turn it into a Pandan Cocoa Chiffon Cake instead. Call me a greedy one but I got the best of both the pandan and cocoa taste in 1 cake :) Greedy me.


Pandan Chiffon Cake
Recipe from Cherry Potato

(A):
5 Egg yolks
30ml Pandan juice
120ml Coconut milk
80ml Corn oil
2tbsp Water

(B):
120gm Cake flour
60gm Sugar

(C):
5 Egg whites
1 tsp Cream of tartar
60gm Sugar

Cocoa powder


1. Mix all ingredients (A) into a bowl till well.


2. Fold in sifted flour and sugar, mix well. Set aside.
3. Whisk egg whites and cream of tartar until frothy.


4. Gradually add in sugar and continue whisk until stiff.
5. Fold the above into egg yolk mixture, mix well with spatula.


6. Pour batter into a 9" ungreased chiffon tube pan. (I poured in 1/3 of the batter into the chiffon tube pan, sifted a thin layer of cocoa powder all round the top of the pandan batter, pour 1/2 of remaining batter over cocoa powder. Sift another layer of cocoa powder again over pandan batter and pour remaining batter in. You may sift another layer of cocoa powder on the top or leave it plain.)


7. Bake at preheat oven 170'C for 50-55 minutes till done.
8. Remove from oven and invert cake to cool.


Tuesday, December 16, 2014

Dual Tone Butterfly Mantou II

And so it is the return of the dual tone butterfly mantou! I love the making process of these butterfly buns. Love to see the transformation of a plain dough into a butterfly shaped bun.

Super LOVE this creative buns recipe book by 彭秋婷 so much it is like a bible to me. I need to flip and read it like everyday!


I did the chocolate flavour ones once more. No change from the last round, except that I included the pictures on how to make those butterfly shapes this time.

Had wanted to try making matcha flavour ones since I have lotsa matcha powder from my Hokkaido trip but shun that thought. I was too afraid of weird tasting buns, so I fell back onto using cocoa powder - don't think I will go wrong with that hehe!

So addicted to making them but I needa put a halt to these. I have so much more things to try so mantou making have gotta take a backseat for now. Till next time!


Dual Tone Butterfly Mantou 雙色蝴蝶捲
Servings: 60g × 12 pcs

(Scroll down for original recipe in Chinese)

A. Dough
7g Instant yeast
260g fresh milk
50g caster sugar
500g plain flour
10g butter

B. 2g red yeast powder (I used cocoa powder)


1. Mix caster sugar with 3/4 of fresh milk (195g) and stir well to dissolve sugar. Sprinkle instant yeast over remaining 65g of fresh milk and let it sit for about 2 minutes before stiring them to dissolve yeast. Place all other dry ingredients in A into a mixing bowl, pour in the wet in ingredients and mix well to form a rough dough. Knead dough till smooth and shiny.

2. Place kneaded dough in mixing bowl and cover with clingwrap to let proof for 5 to 10 minutes.


3. Divide dough into 2 equal portions. Knead red yeast powder (or cocoa powder) into 1 portion of dough till colour is even and dough is smooth and shiny. Roll out 2 of the dough till flat and almost even size.


4. a) Brush water on 1 side of each flattened dough and place 1 dough of top of the other. Trim off sides of layered dough to get a rectangular shape and carefully roll up layered dough like rolling swiss roll. About 1cm at the end of the dough, brush on some water and gently press down dough to flatten it a little. Leave a tip of the end unrolled.


b) Using a sharp knife, make precise cuts of about 1cm each. Place 2 pieces of cut dough together, sides of the dough with unrolled end facing each other. Place 2 chopsticks by the sides of the dough and press in chopsticks to meet (to form wings of butterfly). Repeat the same for the rest of the cut dough.

5. Place baking paper under dough and leave dough in steamer to proof for 20 to 30 minutes.


6. Steam mantou on medium high heat for 8 minutes. Make sure water is boiling before placing in mantou. Place lid cover sideway for about 1 minute. Remove steamer with lid covered slideways away from stove and let cool for further 2 minutes or so to cool - this is done to prevent mantou skin from crinkling up with the sudden temperature change. Serve warm!

To store, place cool mantou in ziplock bag and keep in freezer. Put mantou to steam again and it will turn soft and fluffy to eat once more.

雙色蝴蝶捲
(Original Recipe in Chinese by 彭秋婷的创意手作中式發面) 

分量  60g x 12个 

A   面团
速溶酵母 --- 7g
鲜奶 --- 260g
细砂糖 --- 50g
中筋面粉 --- 500g
奶油 --- 10g

B   红麹粉 --- 2g (我用可可粉)

1   搅拌 
先将细砂糖与配方中 3/4 的鲜奶充分搅拌均匀, 酵母与配方中 1/4 的鲜奶拌均匀, 将其他材料 A 放入盆中, 再倒入液状材料揉至呈光滑面团。

2   松弛
盖上湿布或保鲜膜, 让面团基本发酵 5-10 分钟。

3   延压
面团分成两等份,一份面团再加入红麹粉揉至光滑,两分钟面团分别擀成相同大小的长条形。

4   整形
a   将两份面皮用水重叠组合,修整四边,再将面皮由长向密实捲起, 在距离收口 1cm 处刷上水,固定好。
b   用刀切取约 1cm 长度, 在两两背面相对, 用筷子夹住成蝴蝶形状, 并捏出蝴蝶翅膀造型。

5   发酵
执上烘焙纸,间隔排入蒸笼層中,最后发酵 20-30 分钟。

6   蒸製
移入热水蒸锅, 以中火蒸 8 分钟,时间到后将蓋子打开一个小缝 1 分钟, 移出蒸锅再放置 2 分钟后掀蓋。

Tuesday, December 2, 2014

Brown Bear Mantou


I am kinda hooked on making mantou nowadays that I have put a temporary stop to bread making.  Seems like. Nah, I will get back to making bread soon I guess. Hubby will get sick of eating my cute creations too hahha!


Mantou. They are often being referred to as Chinese steamed bun or bread. They are so easy to do and somehow gives me a gratifying feel more so than bread. Not sure why too but I guess it is because I can make them and keep them away in the freezer, put them to steam and eat them rightaway when they are at their softest taste.

I took a pic of this along with some X'mas deco to give it some Christmasy feel.

This time, I made a dozen of cute brown bear mantou using 彭秋婷的创意受1作中式发面 book. I definitely had fun making them! Best of all, you need not have to own an oven to make these.  If you are in for some cute bun making, this should be it :)

Again, I did a simple translation of the original recipe by 彭秋婷

Brown Bear Mantou
Servings: 90g × 12 pcs

A. Dough
7g Instant yeast
270g fresh milk
50g caster sugar
500g plain flour
10g butter
24g cocoa powder

B. Dough
50g flour
5g caster sugar
1g yeast
25g water

1. Mix caster sugar with 3/4 of fresh milk and stir well to dissolve sugar. Mix instant yeast with remaining 1/4 fresh milk. Place all other dry ingredients in A into a mixing bowl, pour in the wet ingredients and mix well to form a rough dough. Knead dough till smooth and shiny. In a separate bowl, put all B ingredients and mix well to form a dough. Set aside.
2. Place kneaded dough in mixing bowl and cover with clingwrap or moist cloth to let proof for 5 to 10 minutes.
3. Roll put main door to rid air bubbles and roll till 1cm thick, and 40cm in length.
4. Cut rolled main dough into 12 equal pieces, about 80g each. Out of each 80g dough, I cut out 2 pcs of 6g dough for the bears' ears (68g will be used for bears' heads). Cut 10g of dough from B dough and add in charcoal powder to make bears' eyes and noses, while remain B white dough will be used for bears' mouths.


5. Roll bears' head into a round shape, place them on cut out baking paper and slightly flatten dough.
Shape bears' ears (6g dough) and stick it into bears' head - I used a chopstick to shape ears and stick it into bears' head.
Divide white dough into 12 pieces, flatten each piece of white dough into an oval shape and adhere it on bears' face. You can brush on some water and place on dough for them to 'stick' better. Place on eyes and noses.
6. Place all deco brown bear mantou into steamer and let proof for 20 to 30 minutes.


7. Steam mantou on medium high heat for 8 minutes. Make sure water is boiling before placing in mantou. Place lid cover sideway for about 1 minute. Remove steamer with lid covered slideways away from stove and let cool for further 2 minutes or so to cool - this is done to prevent mantou skin from crinkling up with the sudden temperature change. Serve warm!


After the steamed mantou have cooled, I packed them into a ziplock bag and freeze them. Put the mantou to steam rightaway without the need to defrost them and you can enjoy piping hot buns with a good cuppa coffee in no time!

熊大创意馒头
(Recipe by 彭秋婷的创意手作中式發面)

分量  90g x 12个 

A   面团
速溶酵母 --- 7g
鲜奶 --- 270g
细砂糖 --- 50g
中筋面粉 --- 500g
奶油 --- 10g
可可粉 --- 24g

B   面团
中筋面粉 --- 50g
细砂糖 --- 5g
酵母 --- 1g
水1 --- 25g

1   搅拌 
a 先将细砂糖与配方中 3/4 的鲜奶充分搅拌均匀, 酵母与配方中 1/4 的鲜奶拌均匀, 将其他材料 A 放入盆中, 再倒入液状材料揉至呈光滑面团。
b 另将面团材料B 全部搅拌均匀备用。

2   松弛
盖上湿布或保鲜膜, 让面团基本发酵 5-10 分钟。

3   延压
取出面团用杆面棍或压面机将面团气泡压出,成厚约1cm约40cm的长条状光滑面皮。

4  分割
A 面团分割80g 12个,B面团切取10g 加入竹灰粉做眼睛,其予白面团做嘴巴。

5   整形
a 面团整形成圆的馒头形状再压扁执上烘焙纸。
b 在头部1压出耳朵位置,用 A 面团以圆的花嘴模压出耳朵,一端捏尖后压扁以工具按压固定在脸部。
c 鼻子用白面团整形后固定在脸部,以竹灰粉面团整形出眼睛及鼻上装饰固定好。

6  发酵
间隔排入蒸笼層中,最后发酵 20-30 分钟。

6   蒸製
移入热水蒸锅, 以大火蒸 12 分钟,时间到后将蓋子打开一个小缝 1 分钟, 移出蒸锅再放置 2 分钟后掀蓋。