Again a maiden attempt at making X'mas log cakes. I have always wanted to try making them but I was really lousy with roll cakes back then and did not want to do log cake with cracked roll cake (though I know it will be covered by the cream and all), but the thought of people seeing the insides when sliced stopped me from all of it.
Now thay roll cakes have been mastered, I gained the confidence to get the log cakes coming! We were invited to my brother in law's house for a X'mas dinner and I definitely did not wanna go there empty-handed - so this log cake came about.

With the long roll cake baked, I sliced it into half and made 2 log cakes with it. Coated the insides and outsides with mao shan wang durian puree. *yummy*
One was brought to my brother in law's place and the other to my Mum's.


Bought these icing sugar figurines from the 100Yen shop in Japan during my recent Kyushu trip.
I had fun making and decorating these log cakes. Will definitely make them again because log cakes are terribly overpriced outside!!!
A
4 egg yolks
35g caster sugar
60ml water
40ml oil
1/4 tsp vanilla essence
80g plain flour
B
4 egg whites
30g caster sugar
1 tsp corn flour
Durian filling
- (I doubled the below amount for outer log cake frosting)
250g durian puree
3 tbsp fresh milk (or more if required to thin durian puree to desired consistency)
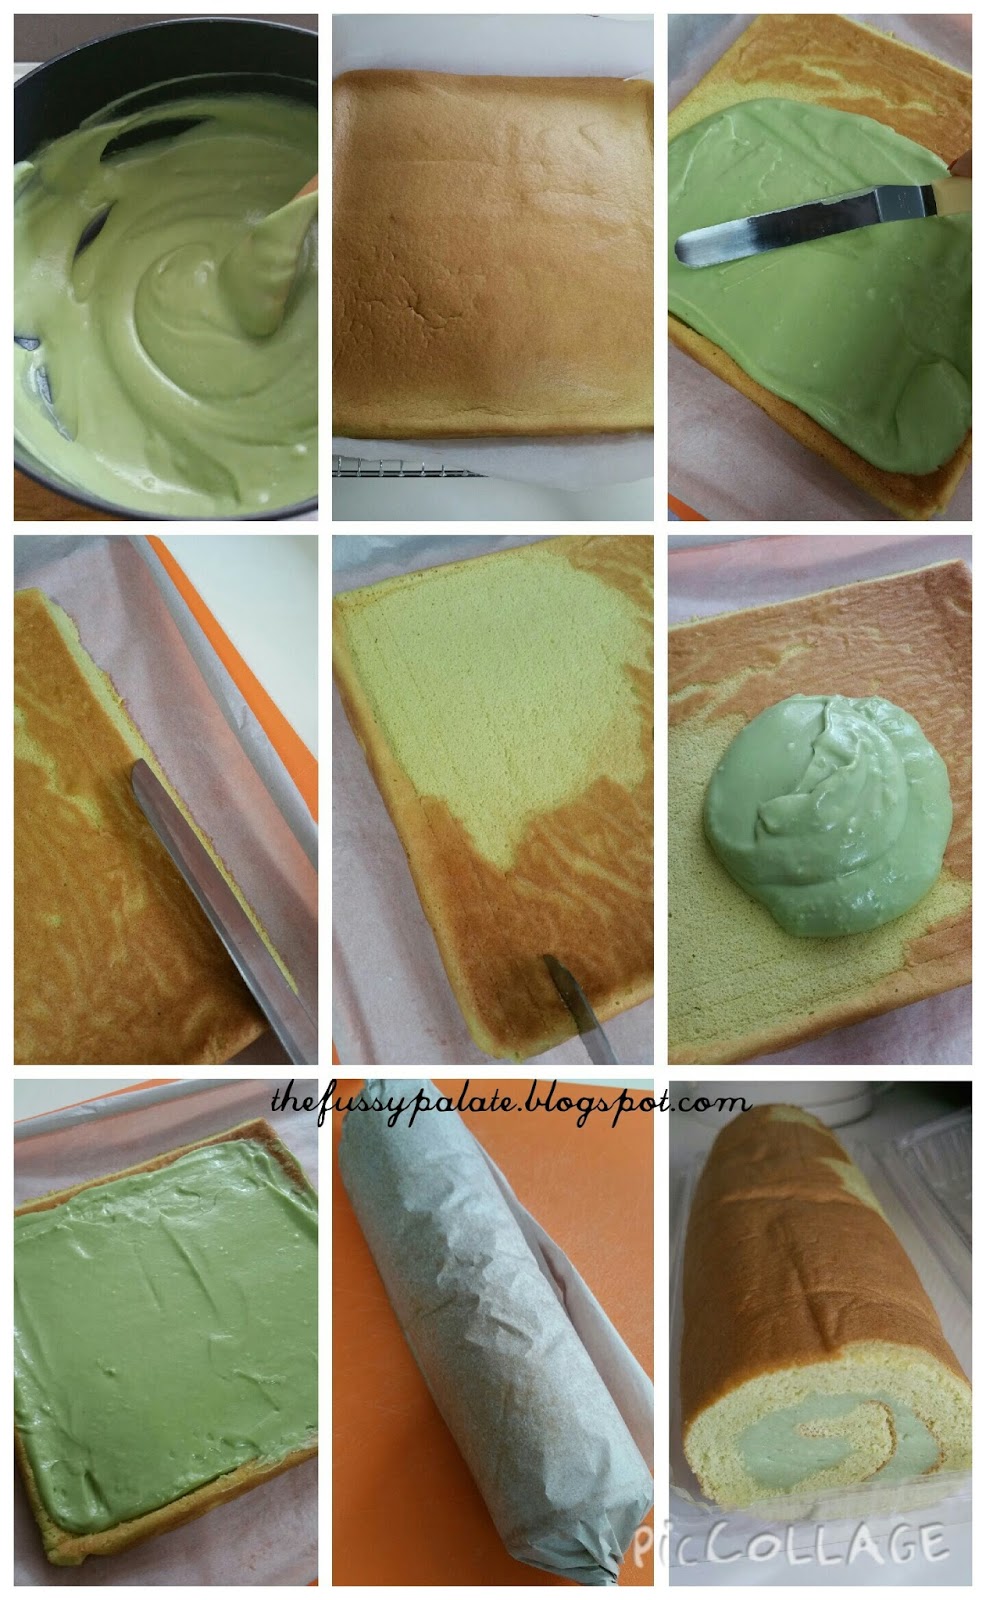
1. Prepare 10inch by 10inch baking tray line with baking paper. You may lightly grease baking tray with some cooking oil and then line baking paper to prevent baked cake from having "wrinkles". Preheat oven to 170deg C. Prepare 2 other pieces of baking paper (slightly bigger size than baking tray) or use later after cake is baked.
2. Combine egg yolks and caster sugar in A and beat till egg yolk mixture turns white and pale, and air bubbles show up when beating stops.
3. Add in water, oil and vanilla essence and mix well. Sift in plain flour and mix well. Set aside.
4. Beat egg whites in a clean and dry bowl till frothy, add in corn flour and beat till combined.
5. In 3 separate additions, add caster sugar into egg white mixture and beat till stiff peaks form.
6. In 3 separate additions, spoon white eggs into yolk mixture and fold in carefully till a smooth batter forms (take care not to overfold and deflate the batter).
7. Pour batter onto lined baking tray and smooth out top with a scraper. Put to bake at 170deg C for 14min or till done. (Cake should spring back when pressed slightly, toothpick to come out dry when inserted into centre of cake, and when pressed gently there should be slight "sss" sound. Overbaked cake will have cracks showing up when rolled.)
8. Remove tray from oven and overturn tray on 1 piece of baking paper atop a cooling rack. Remove the lined baking paper sticking on cake and cover cake with baking tray. Let cool for about 10min or till cake is cool. Remove baking tray.
9. Spread prepared durian filling all over cake, leaving about 1cm of far end clear of filling.
10. Roll up cake into a log shape with the help of bottom baking paper and twist sides of baking paper to hold the cake. Rest rolled cake with the end at the bottom and leave cake in fridge for 15-30min before frosting the outsides with the remaining half of durian puree.
11. To assemble log cake, you can slice about an inch or 2 inch of rolled cake and placed it by one side of the rolled cake, or however you want your log cake to look like. Slap on the durian puree and frost away with a palate knife - does not matter if you cannot get a smooth frosting because you are gonna make log lines on the frosting anyway!
12. After the full frosting is done, use a fork and "draw" lines on the whole cake to make it look like a log. Decorate with your favourite (clean!!! :P) Christmas figurines and refrigerate. You can dust the top of the cake with a light layer of icing sugar otherwise it is good to go. Best served chilled.