Sunday, August 9, 2015

Oreo Cheesecake & Coffee Cheesecake Cups


Made these cheesecake cups for my colleagues as a little Thank-You gesture for the farewell lunches and gifts I received.  It was my first time making cheesecakes into little dessert cups and I definitely love how they turned out. Cute, dainty and sweet little cheesecake cuppies. I want to do these again!


Colleagues commented that the plastic dessert cups were cute. Got them from Phoon Huat (not cheap!!!). Gonna try purchasing them from Tao Bao :)

Since this post is done on 9 Aug 2015 - being the SG50 post, I'll end here with a Happy 50th National Day to Everyone & All Singaporeans!!!


Coffee Cheesecake Cups
Makes 10 cups

Bottom base
90g digestive biscuits crumbs 
30g oreo biscuits crumbs 
65g butter (melted) 

Fillings
250g cream cheese 
60g sugar 
12g instant coffee (dissolve with 1 tablespoon water) 
2 teaspoon gelatin (dissolve with 1 tablespoon hot water) 
170ml whipping cream 

Deco (Optional)
10 chocolate coated coffee beans

1. Mix the crumbs and melted butter in a bowl. Spoon 2 to 3 tsp of cookie base into dessert cups and gently press to level base and keep in the fridge. (Do not press base hard as it might be hard and difficult to spoon out to eat)
2. In another bowl, beat cream cheese until soften, gradually beat in sugar until the sugar dissolve. Add in the coffee mixture until well blended.
3. Whisk the whipping cream in another bowl until thicken.
4. Mix the dissolved gelatin into the coffee mixture until well incorporated. Fold in the in the whipped cream until everything well combine.
5. Spoon in cheese mixture into dessert cups  till 3/4 full and chill in the fridge until it set.
6. After the cheesecake has set, decorate each coffee cheesecake cups with a chocolated coated coffee bean. Enjoy!


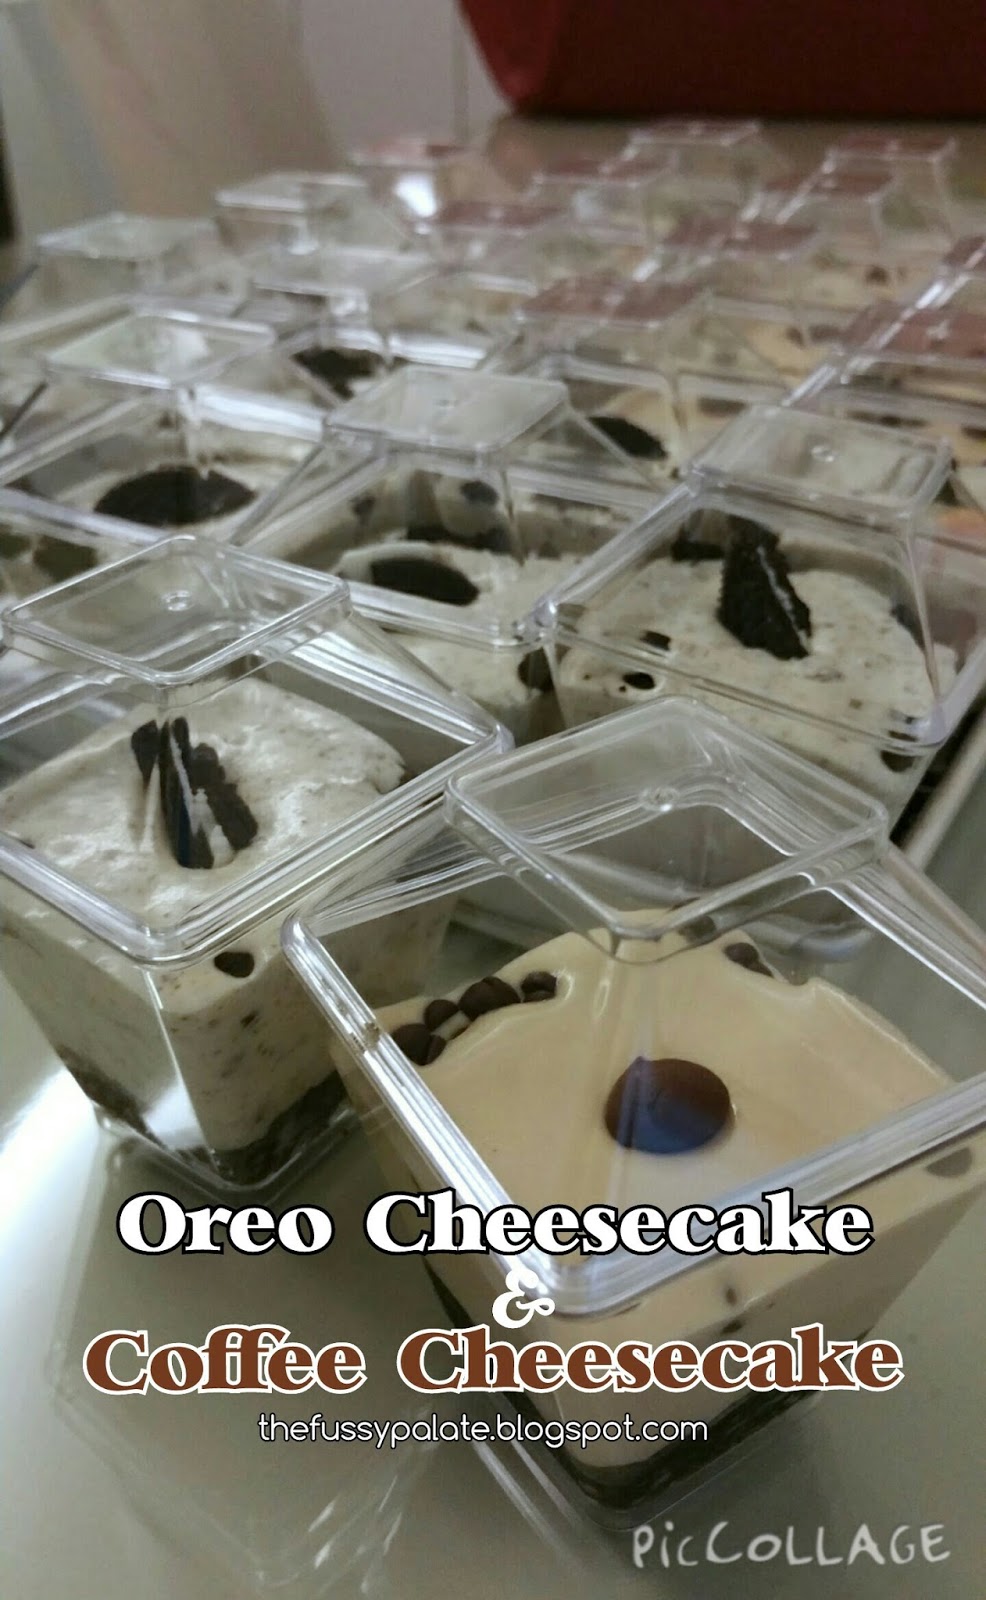
Oreo Cheesecake Cups
Makes 10 cups

Bottom base
90g digestive biscuits crumbs 
30g oreo biscuits crumbs 
65g butter (melted) 

Fillings
250g cream cheese 
60g sugar 
2 teaspoon gelatin (dissolve with 1 tablespoon hot water) 
170ml whipping cream 
14 individual pcs of oreo cookies (cream removed), crush with a rolling pin till you get a mixture of fine bits and chunky bits 

Deco (Optional)
Oreo cookies (I broke each oreo cookies (with cream on) into 4 quarters)

1. Mix the crumbs and melted butter in a bowl. Spoon 2 to 3 tsp of cookie base into dessert cups and gently press to level base and keep in the fridge. (Do not press base hard as it might be hard and difficult to spoon out to eat)
2. In another bowl, beat cream cheese until soften, gradually beat in sugar until the sugar dissolve. 
3. Whisk the whipping cream in another bowl until thicken.
4. Mix the dissolved gelatin into the cream cheese mixture until well incorporated. Fold in the in the whipped cream until everything well combine. Add in crushed oreo bits and fold in briefly.
5. Spoon in oreo creamcheese mixture into dessert cups till 3/4 full, Place oreo cookie as deco on top, and chill in the fridge until it set. Enjoy!

Saturday, August 8, 2015

Chocolate Roll Cake with Nutella filling

Currently on a 10 days break before starting on my new job,  I have lots of time on hand to spare. Catching up on the hours of sleep that I have lost, prepping food,   cooking dinner as well as prepping breakfast for Hubby. I am so enjoying this period! Counting down to the days I get back to work again, if only time could stay still haha!

Now, you are in for some eye feasting here. I made my first ever chocolate roll cake and it was a nice one.


If you are a chocolate lover, you will love this cake. Chocolate cake with nutella filling, convinced? Nothing can really go wrong with Nutella actually. Heehee!

Will make this cake again because I love chocolate cake :)

Anyway, Happy Golden Jubilee Weekend to All! Have a wonderful long weekend break with your family and loved ones :)


Chocolate Roll Cake with Nutella filling


20g cocoa powder
40g hot water
60g egg yolks (about 3 big eggs, or 4 small eggs)
50g caster sugar
50g canola oil
15g milk + 15g espresso coffee, without milk/sugar (can just skip this and use 30g milk if no coffee. I use coffee to intensify the chocolate flavour and taste.)
75g plain flour

130g egg white
55g caster sugar

1. Mix cocoa powder with hot water amd stir well to form a thick smooth chocolate paste. Set aside.


2. Whisk egg yolk and sugar till well mixed and sugar is dissolved.  Add in canola oil, milk and espresso coffee and whisk to combine.


3. Add in chocolate paste and mix well with the egg yolk mixture.
4. Sieve plain flour into egg yolk mixture and whisk till combined.


5. With an electric mixer, beat egg whites till foamy. Add in caster sugar in 3 additions, making sure each addition is well mixed before adding more. Beat till stiff peaks form.

6. Place 1/3 of egg white into yolk mixture and fold in gently with a spatula or a whisk.
7. Fold in remaining egg whites in 2 additions till just incorporated. Make sure not to over fold and deflate the chiffon mixture.
8. Pour chiffon mixture into lined tin (10"×12"),  use a scraper to spread out and level mixture.


9. Put to bake in preheated oven at 180deg C for 12 to 15min or till done. (I baked 180deg, 21min in my Rowenta oven) To test done-ness, when cake springs back and makes a "sss" sound when pressed, it is done.
10. Remove and place on cooling rack. Place a new baking paper over top of cake and flip over to other side of cake. Remove baking paper and let it cool slightly before  rolling. You can choose to roll cake on either side of the cake.
11. Slice off end of swiss roll to form somehwat 45deg angle so that when cake is rolled till the end, it gets tucked nicely underneath. At the front of the cake where you will start the rolling, make 2 horizontal cut gently on the cake to allow easier rolling. Take care not to slice through cake.

12. Spread your favourite fillings and start rolling! (I used the all-time favourite Nutella spread)
13. Wrap rolled cake in baking paper and leave in fridge to set its shape for about 45min before slicing.


I prefer leaving the roll cake out till nutella filling has softened a little before eating.

Thursday, August 6, 2015

Purple Sweet Potato Roll Cake with Vanilla Greek Yoghurt Filling


Seems like I am not quite done with my swiss roll craze! I am still rolling away and am certainly enjoying each roll better :). Getting the hang of baking and rolling this cake which was on once a big challenge for me.


Cracked cake, sticky tops, I had them all but I am glad I made it through with practice (and no giving ups!). I got to know what is the comfortable temperature and time to turn out a good cake, easy for me to handle and of cuz yummy enough for the tummies.

So, what's with the purple sweet potato in my roll cake? It was not in my plan to bake this actually but as I was peeling some purple sweet potatoes and putting it to steam for my breakfast, I thought I could try making some purple roll cake with it! Sadly the cake did not turn out to be a nice purple hue that I imagined it to be. It was still good anyway.

I was lazy to beat up butter or whipped cream for the cake filling, so I used greek yoghurt instead. With a slight sour twist to it, it gave the cake a refreshing feel since the purple sweet potato (seriously) did not contribute much taste to the cake.  I enjoyed it anyway :)


Purple Sweet Potato Roll Cake with Vanilla Greek Yoghurt Filling

60g egg yolk
30g canola oil
15g caster sugar
45g milk
50g mashed purple sweet potato (steam sweet potato and mash it right after it is dteamed and still hot)
65g plain flour

160g egg white
70g caster sugar

1. Whisk egg yolk and sugar till well mixed and sugar is dissolved.


2. Add in canola oil and milk and whisk to combine.
3. Add in mashed purple sweet potato and whisk well to break up potato mash and incorporate it well with egg yolk mixture.
4. Sieve plain flour into mixture and whisk to stir till combined.
5. With an electric mixer, beat egg whites till foamy. Add in caster sugar in 3 additions, making sure each addition is well mixed before adding more. Beat till stiff peaks form.


6. Place 1/3 of egg white into yolk mixture and fold in gently with a spatula or a whisk.
7. Fold in remaining egg whites in 2 additions till just incorporated. Make sure not to over fold and deflate the chiffon mixture.
8. Pour chiffon mixture into lined square tin (10"×10"), then use a scraper to spread out and level mixture.
9. Put to bake in preheated oven at 180deg C for 12 to 15min or till done. (I baked 180deg, 21min in my Rowenta oven) To test done-ness, when cake springs back and makes a "sss" sound when pressed, it is done.
10. Remove and place on cooling rack. Place a new baking paper over top of cake and flip over to other side of cake. Remove baking paper and let it cool slightly before  rolling. You can choose to roll cake on either side of the cake.
11. Slice off end of swiss roll to form somehwat 45deg angle so that when cake is rolled till the end, it gets tucked nicely underneath. At the front of the cake where you will start the rolling, make 2 horizontal cut gently on the cake to allow easier rolling. Take care not to slice through cake.


12. Spread your favourite fillings and start rolling! (For me, I used vanilla greek yoghurt.)
13. Wrap rolled cake in baking paper and leave in fridge to set its shape for about 45min before slicing.


Wednesday, August 5, 2015

Easy Coral Lettuce Salad

I love vegetables but somehow never really enjoyed eating salad. I prefer my vegetable blanched or stir fried. I love flavours so I can never stick to eating salad for a long time. Salad are so plain and boring lor ), at least for me lah.

The hubby requested for salad for last night's dinner. I needed to do something to spruce up the salad dinner. I did not want to feel like a cow feasting on a bowl of green veggies!!! Okay... I could add in this one thing to bring out more taste to that bowl of green thing. Tried and oh it was so so good.


Enjoyed the salad dinner tonight and wouldn't mind having this again :)

Secret to my yummy bowl of salad was adding in some homemade chicken floss. Hehe~

I love flavours.
I love colours too. :)

Easy Coral Lettuce Salad
For 2 to 3 person

2 bunches of coral lettuce or any salad veggie of your choice, washed and torn into smaller pcs
10 cherry tomatoes, washed and halved
1 hard boiled egg, cut into small bite sizes
2 tbsp of homemade chicken floss (for the tossing) + 1 tbsp (or more for the topping)
5 to 6 tbsp toasted sesame dressing (I use Kewpir brand)

1. Place coral lettuce in a mixing bowl, add toasted sesame dressing, mix and toss well.
2. Add in 2 tbsp chicken floss and mix well.
3. Spoon coral lettuce into serving bowls, place halved cherry tomatoes and hard boiled egg pieces on top of coral lettuce. Top with some chicken floss. Serve.

Tuesday, August 4, 2015

Mini Wholemeal Hotdog Buns


I took a short 3 weeks break from bread making because I was kind of on a roll cake craze. 

Back with buns for breakfast. Wanting to clear those hotdogs lying in my freezer, I used them in my buns and made them into mini sized buns.

Love how these mini buns turned out. Soft, fluffy and cute looking. Gonna make more mini buns from now on! Plus more varieties in one batch bake too :)


Mini Wholemeal Hotdog Buns

Gelatinized dough

50g bread flour
35ml boiling water

1. Place flour in a mixing bowl.
2. Add hot boiling water and mix with wooden spoon to form a rough dough.
3. Cover bowl with cling film and leave dough to cool in the fridge for at least 1 hour, and up to 48 hours.


Basic sweet bread dough


(Yield roughly 490g dough)

150g bread flour
50g wholemeal flour
40g sugar
10g milk powder
4g instant yeast
1/4 tsp or 3g salt
87ml cold water
30g cold egg
30g butter, room temperature


7 chicken franks (hotdogs), sliced into half to make 14 pcs 

Buns


1. Tear gelatinized dough into smaller pieces into the bread machine. Add water, beaten egg and top with flour And milk powder. Place salt and sugar on opposite corners of bread machine, make a small deep hole in centre of flour and spoon in instant yeast. Gently cover yeast with some flour and set BM to work. I use Function 8 fory Kenwood BM250 for this step. 

2. When dough has come together and is more or less a smooth dough, add in softened butter. I restarted my BM on Function 8 again and let BM mix till well incorporated with dough and is smooth and soft. I then remove dough and hand knead till dough reaches window pane stage, where you get a thin translucent membrane when dough is stretched. (This more or less tells you that you will get soft and fluffy bread and buns!)

3. Shape dough into a ball, leave to proof for 40 min or until doubled. 

4. Punch down dough to rid excess air, then divide dough into 14 equal portions at 35g each and roll it round and set aside for 5 min to let it relax for easier rolling. 
Slightly shape round dough into a tear drop shape and roll it flat and long.


5. Place half a hot dog on wide side of flattened dough and roll up. Repeat for the remaining dough. Place each dough about 1.5cm apart on a greased baking tin.


6. Cover with clean moist cloth and leave to proof for 40min or till doubled in size. 

7. Brush bun tops with whisked egg yolk mixed with 1 tsp water, sprinkle some white sesame on centre of each dough and bake in a preheated oven at 180°C for 12 to 15min or till slightly golden brown. 


8. Cool on a wire rack before storing in an airtight container.


Fragrance of freshly baked buns filled my kitchen

Mini wholemeal hotdog buns with a cup of freshly brewed coffee. Simple. Pure bliss :)


Monday, August 3, 2015

Salmon with Salted Soy Bean Paste

Hubby and I have been eating lots of salmon and cod fish recently. We buy a whole salmon fish which is much cheaper this way. Cod fish wise, we buy it in slices. Not a wise choice but let's just say at least I am picking up on eating more fish and it is way healthier than consuming seafood :P

Flipping through the stack of recipe books, I realised I have many salmon fish recipes to try my hands on. More to come!!!


For this salmon with salted soy bean paste, I paired it with plain porridge as the soy bean paste was salty and the plain porridge could take away part of the saltiness. A different taste of pairing soy bean paste with salmon, not too bad if you are not into cooked salmon because soy bean paste helps mask the cooked salmon smell.


Salmon with Salted Soy Bean Paste
Recipe adapted from the asian oven by Jo Marion Seow with slight adjustments made


*Original recipe uses Halibut fillet but I replaced it with salmon fish

4 Halibut fillets, about 150g each (I replaced it with 2 salmon fillets)
3 tbsp salted soy beans (tau cheo) (I used just 1.5 tbsp soy beans)
1 clove garlic , peeled and grated
1 thumb-size knob ginger, peeled and grated
2 tsp sugar
2 tsp cooking oil
1 spring onion (scallion), sliced

1. Preheat the oven to 200deg C.  Line a baking dish with non-stick baking paper.
2. Place halibut fillets in the baking dish in a single layer.


3.  Mash salted soy beans with the back of a spoon.  Mix garlic, ginger, mashed salted soy beans, sugar and oil.  Spread this mixture in an even layer on the halibut fillets.  Bake in the oven for 6-8 min.


4. To check if the fish is cooked, insert a fork into the thickest part of the fillet.  If the fish breaks up easily, it is done. Otherwise, bake for a further 1-2 min.
5. Once the fish is cooked, sprinkle spring onion on top and serve immediately.

Sunday, August 2, 2015

Sharp leaves Spinach Pork Ribs Soup

I miss cooking soup because they are just so simple, and the benefits we get from consuming soup are too many to be mentioned.


Hubby and I do not eat lavishly. Simple meals work better for us. So, one soup one dish is more than enough for us 2. Good for me too hehe! I need not rack brain to cook up a feast.


Short posts nowadays. With the new job coming, I hope I will get time to blog still!

Be right back!

Sharp leaves Spinach Pork Ribs Soup

280g pork rib or lean pork
2 dried scallops (big) or a handful of small dried scallops, rinsed
2 dried fig, rinsed
1 honey date
1 medium sized carrot, peeled and cut into 3 big chunks
1 bunch of sharp leaves spinach, picked and washed
Salt to taste

1.Rinse pork ribs or lean meat. Blanch in a pot of boiling water to remove scums and oil. Rinse well and leave aside.


2. Put all ingredients (except spinach and salt) into boiling water.  Bring to a boil. Simmer over low heat for 1 hour. 


3. When ready to consume, bring soup base to boil, add in spinach, add salt to taste.  Serve.

Saturday, August 1, 2015

Pandan Roll Cake with Pandan Kaya Jam

Some time back a lovely lady got me a yummy kaya swiss roll from the famous Rich & Good Cake from Kandahar Street, and I was so so in love with their roll cakes from then on. 

I had always been wanting to replicate a roll cake similar to that kaya swiss roll, I thought why not try using the kaya custard we use for pandan kaya sponge cake as filling for my pandan roll cake, and so I did. 

I rolled the cake with the cake skin layer on the outside (外捲法), but did not do a good job there and a portion of the cake skin came off after I unwrapped it after refrigerating it. Looks aside, the cake was good. The pandan kaya jam filling was good when paired with the chiffon roll cake. This cake is not like the kaya swiss roll from Rich and Good Cake shop but it was okay enough for me when my crave for roll cakes come on.


Filling is a custard like kaya jam that is used for pandan kaya sponge cake, except that I spread it and rolled it inside.

This cake was made for mum since she is a pandan and kaya fan.  I am quite like mum, so I will surely make this cake again!

Oh one last note, do use fresh pandan juice for this if it is available within your country. Fresh pandan juice does make a whole lot of difference compared to using pandan essence.


Pandan Roll Cake
Recipe adapted from Copy Cake Kitchen 

A
60ml homemade pandan juice
50ml corn oil
10g sugar
pinch of salt
50g cake flour (sifted)
10g corn flour
3 eggs yolk

B
3 eggs white
35g sugar
1 tsp lemon juice (I did not use it)


1. Whisk ingredients A- pandan juice, corn oil, sugar and salt until sugar dissolve.
2. Add in sifted flour, continue to whisk. Then, add egg yolks, stir to combine. 
3. In other bowl, beat egg white,sugar and lemon juice until soft peak form.
4. Take 1/3 of egg white and use a hand whisk to mix into egg yolk batter.
5. Fold in the balance egg white with a spatula till well combine.
6. Gently pour the batter into lined baking tin (10"x10"x3"). 7. Smooth out to the corners with a scraper.


8. Bake in preheated oven at 170c for 25 minutes.
9. Once the cake done, transfer the cake to wire rack.


10. Invert the cake and gently remove the baking paper.
11. Spread Pandan Kaya filling evenly onto cake.


12. Roll it up gently and tightly, wrap and chill for 30-60 minutes.


After all the above is done, slice and nom rightaway!


Pandan Kaya filling:

Recipe adapted from Fong's Kitchen Journal with slight adjustments made

50g sugar (I used 35g sugar)
200ml water (I replaced this with 200ml fresh pandan juice)
3g agar agar powder
25g hoon kueh flour (green bean flour)
150ml coconut milk
1/2 tsp pandan paste (I skipped pandan paste and used 3 drops of green food colouring instead)
Pinch of salt


1. Boil water (replaced by pandan juice) and sugar in a small pot on medium heat till the sugar dissolves.  
2. Mix together the agar agar powder, hoon kueh flour, coconut milk, pandan paste ( replaced by green food colouring) and salt.  Pour this mixture into the pot and keep stirring till the mixture thickens.  
3. Remove from heat and continue to stir the mixture for another minute to cool down the filling.  Let it cool slightly before using.


Notes:
I blended 8 pcs of pandan leaves with 270ml water for use with the cake and filling. Squeeze the blended pandan leaves to get the excess juice. Pour the juice through a sieve to remove pandan pulps.